Why I Keep Coming Back to This Simple Vanilla Slushie
There’s something truly comforting about a vanilla slushie melting just enough to coat your tongue with cold, creamy sweetness. It’s unpretentious, honest, and evokes childhood memories of carefree summer afternoons spent with a simple treat in hand. Making this at home transforms an ordinary day into a moment of joy—a small celebration of effortless refreshment. The beauty lies in its simplicity; no complicated gadgets or exotic ingredients are needed, just a handful of pantry staples and a blender.
What I love most about this recipe? Its forgiving nature. It’s like a blank canvas that invites customization. Whether I crave a comforting escape after a long day or a quick way to beat the heat, this vanilla slushie delivers every time. It reminds me that sometimes, the best things in life are the simplest—just pure, frosty vanilla goodness that hits the spot without fuss or fussiness.
Where I Find My Love for This Recipe
- Road trips are incomplete without this treat—it’s a portable, no-fuss way to cool down on the go. Plus, it’s made with pure vanilla, steering clear of artificial flavors.
- It’s a testament to how basic ingredients—vanilla, sugar, and ice—can come together to create something unexpectedly delightful with just a little effort.
- On sweltering days, blending up this slushie feels like a tiny act of rebellion against the heat—no need for fancy appliances or store-bought options.
- Every batch is a little different—sometimes extra creamy, sometimes icier—making each sip a small, sweet surprise that keeps me coming back for more.
- Sharing this simple treat with friends sparks nostalgic conversations and creates new memories, no matter your age or the season.
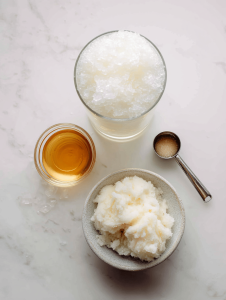
Ingredient Breakdown: What Makes This Slushie Shine
- Vanilla Extract: The aromatic punch of vanilla elevates the flavor, imparting warmth and depth that plain ice cannot provide. It’s the soul of the recipe.
- Sugar: Balances the chilliness with a gentle sweetness. For a richer, more complex flavor, honey or maple syrup can be substituted.
- Heavy Cream: Contributes a silky richness that makes each sip feel indulgent. For dairy-free options, coconut milk is a fantastic alternative.
- Ice Cubes: The core of the slushie—crushed or whole—determines the texture. Too much ice results in a frozen block, while too little can make it too creamy. Balancing this is key.
- Milk: Helps blend everything smoothly. Whole milk gives a luscious finish, but almond or oat milk keeps things light and vegan-friendly.
- Pinch of Salt: A tiny sprinkle enhances the vanilla flavor, preventing it from feeling flat or dull.
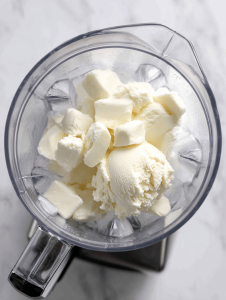
Making the Magic: Step-by-Step Guide
Equipment & Tools
- Blender: Essential for pulverizing ice and achieving that perfect slushy consistency.
- Measuring spoons: For precise vanilla, salt, and sugar measurements.
- Small saucepan: Optional, useful if you want to create a quick vanilla syrup for added flavor.
- Freezer-safe container: To chill ingredients or store leftovers for later.
Steps
- Begin by measuring 1 cup of ice cubes. For an extra icy experience, add a few more.
- In the blender, combine 1 cup of milk, ½ cup of heavy cream, 2 tablespoons of sugar, a teaspoon of vanilla extract, and a tiny pinch of salt.
- Blend on high for about 30 seconds—look for a frosty, slush-like texture. If it’s too runny, add more ice and blend again until desired consistency is reached.
- Check the texture: it should be thick enough to hold its shape but still scoopable. If too thick, splash in a little more milk and pulse briefly.
- Pour into glasses immediately. This treat is best enjoyed cold and fresh, right from the blender.
- For a smoother sip, give it a quick pulse before serving.
Resting & Finishing
If you’re not drinking the slushie immediately, pop it in the freezer for about 10 minutes to firm up slightly. This ensures it maintains the perfect icy texture when served. Remember, it’s always better fresh, but a quick chill can help when you’re making it ahead.
How to Know It’s Done
- The mixture should be thick and slushy—not watery or icy solid.
- It should hold a scoop shape when spooned.
- It should smell fragrant with a rich vanilla aroma—no raw dairy scent lingering.
Mistakes and Fixes for Vanilla Slushie Success
- Forgot to chill your ingredients: Always use cold milk and cream. Warm liquids melt the ice too quickly, resulting in a watery slushie.
- Dumped too much ice: Reduce the amount of ice or blend longer to achieve a smoother, creamier texture.
- Over-torched the ice: Use crushed or smaller cubes for easier blending and a more uniform consistency.
- Skipped the vanilla extract: Add a splash more if the vanilla flavor seems muted—vanilla makes all the difference.
Quick Kitchen Fixes
- Too icy? Splash in a bit more milk and pulse briefly to soften the texture.
- Want a richer flavor? Stir in a dollop of sweetened condensed milk after blending for extra creaminess.
- Too sweet? Add a squeeze of lemon or lime to brighten the flavor profile.
- For an adult twist, stir in a splash of bourbon or rum—perfect for summer gatherings.
- If the batch is too thin, freeze for an additional 5 minutes, then re-blend for an extra thick consistency.
There’s a certain unpretentious charm in a vanilla slushie. It’s straightforward, honest, and refreshingly simple—especially during the blazing heat of summer. Making it at home allows you to tweak the ingredients to suit your taste, whether that’s adding more vanilla, a splash of booze, or a dash of citrus for brightness. It’s a versatile treat that can be as indulgent or as light as you like.
In the end, this vanilla slushie isn’t just a cool drink; it’s a reminder that sometimes, the most satisfying recipes are the simplest. Whether you’re escaping the sun or just in need of a quick pick-me-up, this icy delight turns everyday moments into small celebrations. So, the next time the weather sizzles, remember that a homemade vanilla slushie is only a blender away from making your day a little cooler—and a lot sweeter.

Simple Vanilla Slushie
Equipment
- Blender
- Measuring spoons
- Small saucepan
- Freezer-safe container
Ingredients
- 1 cup ice cubes crushed or whole
- 1 cup milk whole or plant-based
- 0.5 cup heavy cream or coconut milk for dairy-free
- 2 tablespoons sugar adjust to taste
- 1 teaspoon vanilla extract pure vanilla preferred
- a pinch salt
Instructions
- Measure out a cup of ice cubes and place them into your blender.
- Pour in a cup of cold milk and half a cup of heavy cream, ensuring both are chilled for the best icy texture.
- Add two tablespoons of sugar to sweeten the mixture, then pour in a teaspoon of vanilla extract for that rich vanilla aroma.
- Sprinkle a tiny pinch of salt to enhance the vanilla flavor.
- Secure the lid and blend on high for about 30 seconds, until the mixture is thick, frosty, and slushy, with a smooth texture that coats the sides of the blender.
- Check the consistency—if it’s too runny, add a few more ice cubes and pulse again until it reaches your desired thick, icy texture.
- Pour the slushie into glasses immediately, enjoying the thick, creamy, and cold treat with a vanilla fragrance.
- If not consuming right away, place the glasses in the freezer for 10 minutes to firm up further without melting too much.
- Give the slushie a quick swirl or pulse before serving for an extra smooth sip.
- Enjoy your homemade vanilla slushie immediately for the best frosty, creamy experience.


