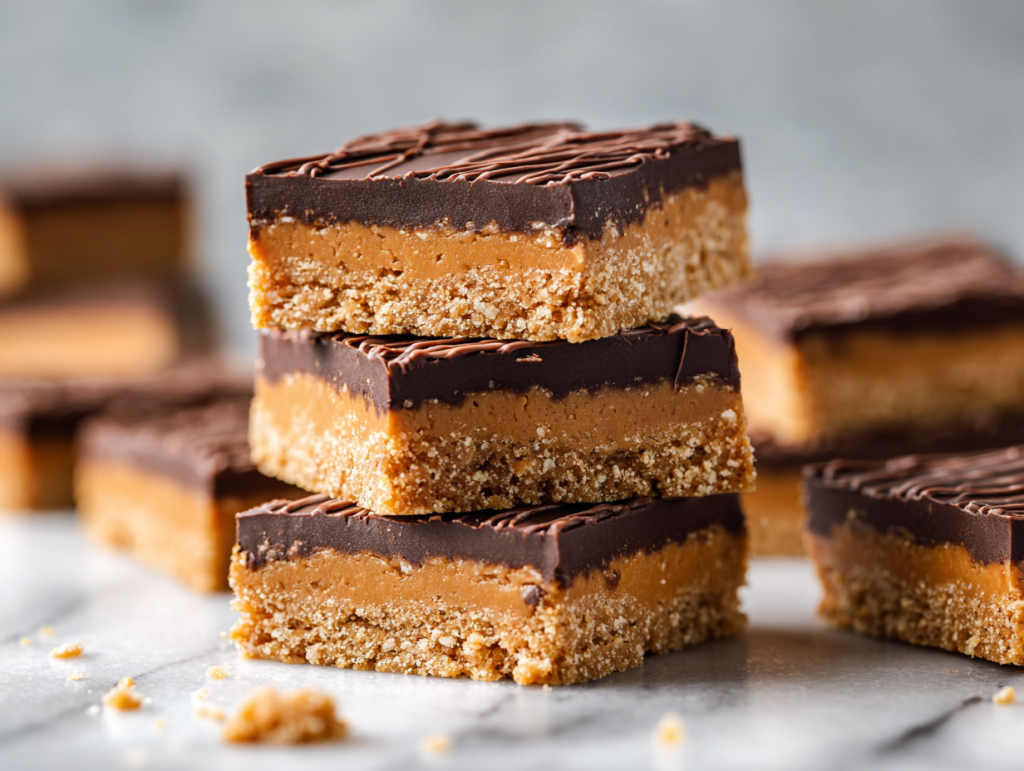
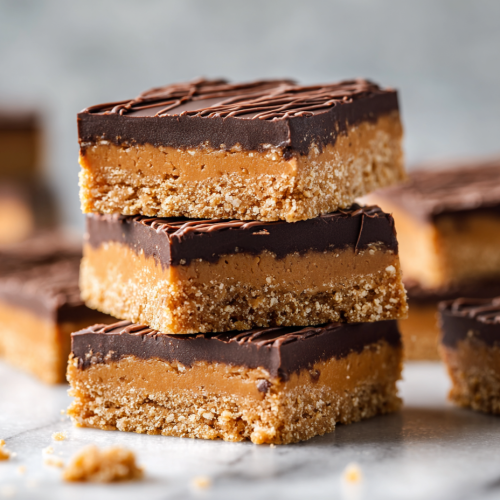
These no-bake peanut butter bars are more than just a quick sweet fix. They’re a cozy reminder of childhood afternoons and lazy weekends, packed into a small, sticky square. I love how they come together with just a handful of ingredients, no oven needed, and still taste like a decadent, homemade indulgence.
Every time I make these, I feel like I’m creating a little piece of comfort—something you can grab when the afternoon slump hits or when friends pop over unexpectedly. They’re honest, straightforward, and oh-so-satisfying, especially when the chocolate layer crackles with that melty, peanutty aroma.
Why I Keep Coming Back to This Simple Classic
- I love how versatile these bars are—add a dash of sea salt or a sprinkle of chopped nuts on top.
- There’s a messy charm in pressing the peanut mixture into the pan—like a mini art project.
- Every time I make these, I feel a wave of nostalgia for simpler sweet treats from my childhood.
- I find the best part is breaking through that glossy chocolate layer—crackling and melting in one bite.
My accidental discovery of the perfect no-bake treat
- I stumbled on this recipe years ago during a busy week when I needed something quick and satisfying. It’s become a go-to because it’s honest, no-fuss, and always hits the spot.
- I love how the ingredients work together—the salty peanut, sweet chocolate, and crunchy bits create a layered sensory experience.
- Making these bars is a bit of a messy, happy chaos, but that’s part of the charm. It’s a reminder that good things don’t need to be complicated.
Ingredient insights and tweaks
- Peanut butter: I prefer natural, oily kinds for a richer, more authentic flavor. Swap with almond or cashew butter for variety.
- Chocolate: Use semi-sweet or dark for depth. Milk chocolate can be too sweet and thin when melted.
- Butter: Adds richness and helps the chocolate melt smoothly. Substitute with coconut oil for a dairy-free version.
- Graham cracker crumbs: They give structure and a slight sweetness. Crushed cookies or oats can work if you’re out.
- Powdered sugar: It binds everything nicely and adds sweetness. You can reduce or replace with honey or maple syrup, but it changes the texture.
Spotlight on Peanut Butter and Chocolate
Chocolate: Melts into a shiny, smooth layer that crackles when cooled. Use good quality for the best snap.:
- Natural peanut butter: It’s oozy and oily, creating a rich, authentic peanut flavor. Stir well before measuring.
- During melting, it turns glossy and smooth, making spreading easy and mess-free.
Coconut oil: Adds a glossy sheen and helps the chocolate layer set smoothly, with a subtle coconut scent.:
- Peanut butter: It has a slightly sticky texture that helps the layers adhere. Warm it slightly for easier mixing.
- Chocolate: When melted, it shimmers and has a deep, smoky aroma that signals it’s ready.
Ingredient swaps for different diets and flavors
- Dairy-Free: Use coconut oil instead of butter for a dairy-free chocolate layer, maintaining a shiny finish.
- Sweetener: Swap powdered sugar with honey or maple syrup for a softer, more complex sweetness.
- Crunchy Texture: Mix in chopped nuts or rice cereal for added crunch.
- Flavor Boost: Add a pinch of sea salt or vanilla extract to enhance flavor depth.
- Vegan Option: Use dairy-free chocolate and plant-based butter or coconut oil.
Equipment & Tools
- Mixing bowl: Combine ingredients smoothly.
- Microwave or double boiler: Melting chocolate and butter evenly.
- Spatula or spoon: Spreading and smoothing layers.
- 20cm (8-inch) square pan: Holding and shaping the bars.
- Parchment paper: Easier removal and clean-up.
Step-by-step guide to perfect no-bake peanut butter bars
- Line a 20cm (8-inch) square pan with parchment paper, leaving a bit of overhang.
- In a microwave-safe bowl, melt the butter and peanut butter together until smooth, about 30 seconds in the microwave. Stir well.
- Add the powdered sugar and graham cracker crumbs to the peanut butter mixture. Mix until evenly combined and no lumps remain.
- Press the mixture evenly into the prepared pan. Use a spatula or the back of a spoon to smooth the surface.
- Melt the chocolate and coconut oil together until smooth, about 1 minute in the microwave, stirring halfway through.
- Pour and spread the melted chocolate over the peanut layer, smoothing with a spatula.
- Chill in the fridge for at least 2 hours or until firm. For quicker setting, freeze for about 1 hour.
- Once set, lift the bars out using the parchment overhang. Cut into squares with a sharp knife.
- Optional: Melt a little extra chocolate and drizzle over the bars for a decorative finish.
- Store in an airtight container in the fridge. Let sit at room temperature for a few minutes before serving for the best texture.
Chill the bars until completely firm, at least 2 hours. For cleaner cuts, refrigerate for 24 hours before serving.
How to Know It’s Done
- Chocolate layer is glossy and firm but not cracked.
- Bar edges are clean and neat when cut.
- Center of the bars feels firm when pressed lightly, not sticky.
No-Bake Peanut Butter Bars
Equipment
- Mixing bowl
- Microwave or double boiler
- Spatula or spoon
- 20cm (8-inch) square pan
- Parchment paper
Ingredients
- 1/2 cup unsalted butter melted
- 1 cup natural peanut butter smooth or crunchy
- 1 cup powdered sugar sifted
- 1 1/2 cups graham cracker crumbs
- 1 cup semi-sweet chocolate chips
- 1 tablespoon coconut oil optional, for sheen
Instructions
- Line your 20cm (8-inch) pan with parchment paper, leaving overhang on the sides for easy removal.
- In a microwave-safe bowl, combine the melted butter and peanut butter. Microwave in 30-second bursts, stirring until smooth and glossy with a fragrant nutty aroma.
- Add the sifted powdered sugar and graham cracker crumbs to the peanut butter mixture. Mix thoroughly with a spatula until the mixture is thick, sticky, and well combined—this will take about a minute and should look slightly glossy and cohesive.
- Press the peanut butter mixture evenly into the prepared pan, using the back of a spatula or your fingers to smooth the top and create a firm, flat surface. You should hear a satisfying resistance as you press, and the layer will feel dense and sticky.
- In a separate bowl, melt the chocolate chips and coconut oil together using short bursts in the microwave, stirring well after each to achieve a shiny, smooth chocolate sauce with a rich aroma. This should take about 1 minute in total.
- Pour the melted chocolate over the peanut butter layer, spreading it evenly with a spatula or the back of a spoon. You want a smooth, glossy surface that crackles slightly as you spread, signaling a perfect coating.
- Place the pan in the fridge and chill for at least 2 hours, or until the chocolate is firm and the bars are set. For quicker results, freeze for about 1 hour.
- Once chilled and firm, lift the bars out of the pan using the parchment overhang. Use a sharp knife to cut into 12 even squares, pressing down firmly for clean edges.
- If desired, melt a little extra chocolate and drizzle over the tops of the bars for an extra decorative touch. Allow the drizzle to set slightly before serving.
- Enjoy these rich, crunchy, and decadent bars now or store them in an airtight container in the fridge for up to a week. Bring to room temperature briefly before serving for the best texture and flavor.
Tips and tricks for perfect no-bake bars
- MELT: Use short bursts in the microwave, stirring often to avoid burning the chocolate.
- PRESS: Press the mixture firmly into the pan for even layers and better slicing.
- CHILL: Chill thoroughly to prevent melting and ensure clean cuts.
- SUBSTITUTION: Swap coconut oil for butter in the chocolate for a different sheen and flavor.
- ADD-INS: Mix in chopped nuts or dried fruit for personalized texture and flavor.
Common mistakes and how to fix them
- FORGOT to chill? Freeze for 30 minutes to firm up the chocolate quickly.
- DUMPED too much chocolate? Add more peanut butter to balance sweetness and texture.
- OVER-TORCHED the chocolate? Stir in a teaspoon of coconut oil to restore smoothness.
- SLICED unevenly? Chill longer, then use a hot, sharp knife for clean cuts.
Quick fixes for common problems
- When chocolate is too thick, splash in a few drops of coconut oil and stir until smooth.
- Patch cracks with melted chocolate—just drizzle over and smooth out.
- Shield the edges with a damp cloth if chocolate begins to set unevenly.
- Splash a tiny bit of hot water into the melted chocolate if it’s too stiff to spread.
- Rescue a sticky mixture by chilling longer or adding a bit more graham cracker crumbs.
Make-ahead and storage tips for your peanut butter bars
- Prepare and press the mixture into the pan a day ahead. Keep covered in the fridge.
- Bars can be stored airtight for up to a week in the fridge for optimal freshness.
- Freezing extends their life to about a month, just thaw in the fridge or at room temp.
- For best texture, bring the bars to room temperature before slicing and serving.
10 Practical Q&As About No-Bake Peanut Butter Bars
1. Can I use crunchy peanut butter?
Use natural peanut butter for a richer, more layered flavor. It adds a slightly oily texture that helps the bars hold together.
2. Can I make these vegan?
Yes, but expect a more textured bar with crunchy bits. It’s a nice variation if you like some bite.
3. What’s the best chocolate to use?
Definitely. Use dairy-free chocolate and plant-based butter or coconut oil instead.
4. How long do they keep?
Opt for a good quality semi-sweet or dark chocolate. It melts smoothly and balances the peanut butter sweetness.
5. Should I refrigerate or freeze?
Keep them covered in the fridge for up to a week, or freeze up to a month for longer storage.
6. Can I add extras like oats or rice crisps?
Refrigerate for best texture. Freeze if you want to store for longer or make ahead.
7. How do I prevent the chocolate from cracking?
Yes, fold in a handful of oats or rice crisps for extra crunch and texture.
8. Can I make these ahead?
Melt the chocolate gently over a double boiler or in short bursts in the microwave. Avoid overheating.
9. Can I use honey instead of corn syrup?
Yes, the mixture can be prepared a day in advance, just keep it chilled.
10. What if I don’t have corn syrup?
You can, but it might alter the sweetness and texture slightly.
There’s a quiet pleasure in biting into something that’s both simple and deeply satisfying. These bars aren’t fancy, but they carry a nostalgic punch that feels just right for quiet weekends or busy weekday treats.
Once cooled and cut, they’re ready to be packed up or served straight from the fridge. Sometimes, I like to add a sprinkle of sea salt on top before the chocolate sets—just a tiny salty contrast that makes the peanut flavor pop even more.


