Halloween isn’t just about sweet treats; it’s also about playful bites that add to the spooky vibe. These quesadillas turn a simple snack into a fun, customizable project. They’re quick, cheesy, and perfect for kids and adults alike. Plus, making shapes with cookie cutters adds a festive flair that’s hard to resist.
Why I keep making these spooky quesadillas
They’re quick, forgiving, and endlessly customizable. The kids love shaping them, and I love how they turn a simple snack into a creative project. Plus, the cheesy aroma filling the kitchen is a small celebration in itself. They’re perfect for those nights when I want something cozy but still in the spirit of the season.
Breaking down the spooky ingredients
- Tortillas: I stick to flour here; they hold up well and are soft yet sturdy.: Opt for larger or thicker tortillas to prevent tearing.
- Cheese: Sharp cheddar melts beautifully, offering that gooey, flavorful punch.: Use a blend for more complex flavor and stretch.
- Black olives: Add a smoky, briny bite—look for firm, shiny olives.: Sub with sliced mushrooms for a similar dark, earthy note.
- Refried beans: Creamy and earthy, they give the base flavor—skip if you prefer low-carb.: Can swap for hummus for a different creamy layer.
- Fillings: Shredded cooked chicken or roasted veggies—whatever you have, really.: Aim for an even spread for uniform bites.
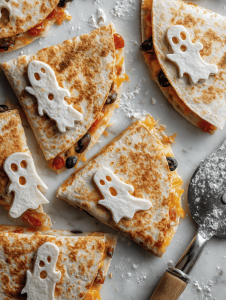
- Halloween shapes: Cookie cutters turn regular quesadillas into festive treats.: Use ghost, pumpkin, or bat shapes for extra fun.
Tools and equipment for spooky quesadillas
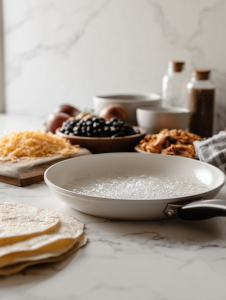
- Non-stick skillet: Prevents sticking and makes flipping easier.
- Spatula: Helps flip quesadillas gently without breaking.
- Cookie cutters: Shapes the quesadilla into fun Halloween figures.
- Cutting board: Prepares fillings and shapes safely.
Step-by-step guide to creating your spooky quesadillas
Step 1: Preheat your skillet over medium heat, about 180°C (350°F).
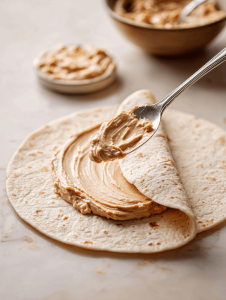
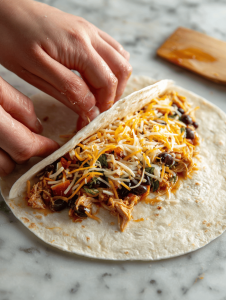
Step 2: Spread a thin layer of refried beans on half of each tortilla.
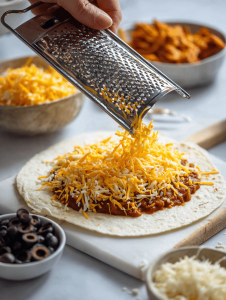
Step 3: Add shredded cheese, black olives, and cooked chicken or veggie fillings.
Step 4: Fold tortillas in half, pressing gently.
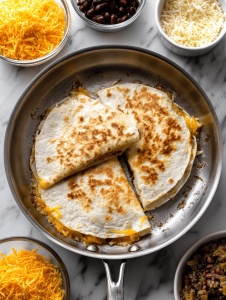
Step 5: Cook each quesadilla for 3-4 minutes on each side until golden brown and cheese melts.
Step 6: Use a spatula to flip carefully, ensuring fillings stay inside.
Step 7: Check for a crispy exterior and gooey cheese, with bubbling edges.
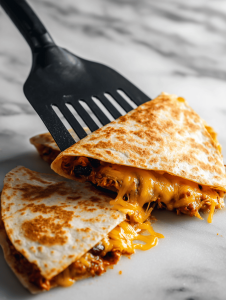
Step 8: Remove from skillet and let rest for 2 minutes before slicing.
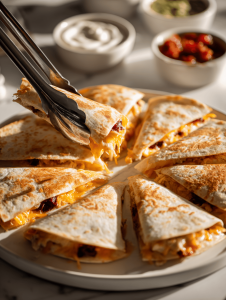
Step 9: Use cookie cutters to make fun Halloween shapes—ghosts, pumpkins, bats.
Step 10: Serve with sour cream, salsa, or guacamole.
Cooking checkpoints and tips for perfect Halloween quesadillas
- Ensure your skillet isn’t too hot; golden brown is better than burnt.
- Cheese should be fully melted and gooey before flipping.
- Check for crisp edges; if not crispy enough, cook a minute longer.
- Use a gentle touch when flipping to keep fillings inside.
Common pitfalls and how to fix them
- Cooking at too high a temperature.? Reduce heat if quesadillas burn before melting cheese.
- Trying to flip too early.? Flip carefully if fillings spill out.
- Cheese not melting evenly.? Add a little water and cover if cheese isn’t melting.
- Shapes tearing during cutting.? Use a sharper knife to cut shapes cleanly.

Spooky Halloween Quesadillas
Equipment
- Non-stick skillet
- Spatula
- Cookie cutters
- Cutting board
Ingredients
- 4 large flour tortillas preferably larger or thicker for sturdiness
- 1 1/2 cups shredded sharp cheddar cheese or a cheese blend for flavor
- 1/2 cup refried beans for spreading on tortillas
- 1/4 cup black olives sliced, for filling and topping
- 1 cup cooked shredded chicken or roasted veggies optional fillings
Instructions
- Preheat your non-stick skillet over medium heat until it feels warm and you can hear a gentle sizzle when testing with a drop of water.
- Spread a thin layer of refried beans over half of each tortilla, covering the surface evenly.4 large flour tortillas
- Sprinkle shredded cheese over the bean layer, then add sliced black olives and your choice of shredded chicken or vegetables on top for extra flavor and texture.4 large flour tortillas
- Fold each tortilla in half, pressing gently to compact the fillings inside.
- Place one or two folded tortillas in the skillet, cooking for about 3-4 minutes on each side until golden brown and crispy, with bubbling cheese visible at the edges.
- Carefully flip the quesadillas using a spatula, ensuring they cook evenly and don’t tear, until both sides are golden and crispy.
- Remove the cooked quesadillas from the skillet and let them rest for 2 minutes, allowing the cheese to set slightly.
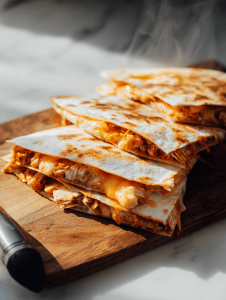
- Using cookie cutters, carefully cut into fun Halloween shapes like ghosts, pumpkins, or bats, revealing the cheesy filling inside.
- Arrange the shaped quesadillas on a serving platter and serve with sides like sour cream, salsa, or guacamole for dipping.