Why I Love This Recipe (And Why You Might Too)
There’s something about the sticky, sweet scent of marshmallow and toasted rice that instantly pulls me into a cozy autumn afternoon. I love how these treats walk the line between nostalgic childhood snack and slightly more sophisticated Halloween party centerpiece. Honestly, I find myself sneaking a second or third piece, even after I’ve sworn I’d only snack a little.
What really hooks me is how easy it is to customize these pumpkin-shaped bites. They’re forgiving, forgiving enough that you can throw in a pinch of cinnamon or a splash of orange extract if you’re feeling fancy. Plus, they turn out great even if you’re not a seasoned baker—just melt, mix, shape, and enjoy.
Where My Heart Is in These Treats
- Nothing beats the chaotic joy of molding these into tiny pumpkins, especially when the kids start giggling at the lopsided ones.
- There’s a quiet pride in turning simple pantry staples into something that feels festive and special.
- These treats remind me of Halloween’s messy, imperfect magic—scratched knees, carved pumpkins, and candy-stuffed bags.
- I love how they come together quickly, so you’re not stuck waiting around—perfect for last-minute parties or a sudden craving.
Ingredient Breakdown: What Makes These Pumpkin Rice Krispie Treats Special
- Marshmallows: I go for the mini ones—they melt faster and give a fluffier texture. Swap with vegan marshmallows if needed, but the taste shifts slightly.
- Butter: A splash of unsalted butter helps everything come together smoothly. If you’re dairy-free, coconut oil adds a faint tropical aroma—just cut the quantity slightly.
- Rice Krispies: The classic crispy rice cereal keeps these treats light and crunchy. Brown rice cereal gives a nuttier flavor, but regular works just fine.
- Food coloring & flavoring: I use bright orange gel food dye to get that perfect pumpkin hue. You can skip or add a pinch of cinnamon or pumpkin spice for extra warmth.
- Optional decorations: Chocolate chips, candy eyes, or a drizzle of white chocolate turn these from simple to spooky. Keep it easy—less mess, more fun.
Step-by-Step Guide to Creating Your Pumpkin Rice Krispie Treats
Equipment & Tools
- Large saucepan: for melting marshmallows and butter
- Spatula: for stirring and mixing
- 9×13 inch pan: to hold the treats
- Parchment paper: for easy removal and shaping
- Small cookie cutters or your hands: to shape pumpkins
- Food coloring & optional decorating tools: for finishing touches
Steps
- Grease your pan lightly or line with parchment paper. Set aside.
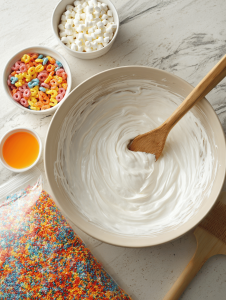
- In a large saucepan over medium heat (about 160°C/320°F), melt 4 tablespoons of butter. Once melted, add 10 oz of mini marshmallows.
- Stir constantly until marshmallows are completely melted and mixture is smooth. Be quick, so they don’t start to brown or stick to the pan.
- Add a few drops of orange gel food coloring. Stir until evenly tinted—aim for a vibrant pumpkin shade.
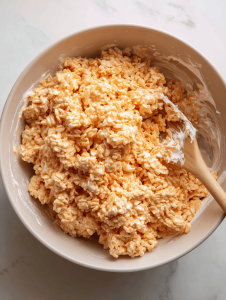
- Remove from heat. Quickly fold in 6 cups of Rice Krispies cereal until evenly coated. If the mixture cools too much, it’s harder to shape.
- Pour into prepared pan. Use a spatula or buttered hands to press down evenly. Let sit for 10 minutes to firm up.
- Once cool, gently lift out of the pan and cut into small squares. Use cookie cutters if you want perfect pumpkin shapes.
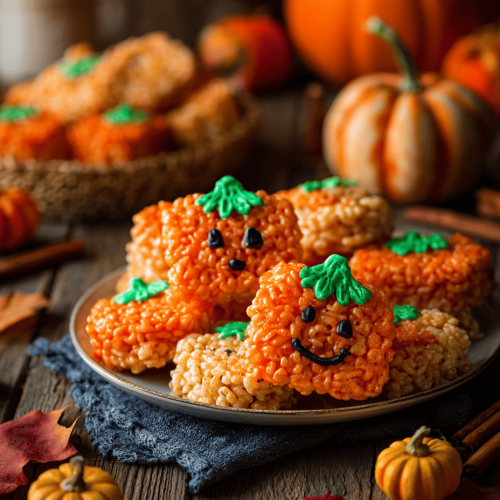
- Shape each square into a tiny pumpkin, pinching the top to form a stem or a little bump. Decorate with chocolate chips or icing if desired.
Resting & Finishing
Let the treats sit at room temperature for at least 30 minutes. This helps them firm up and makes them easier to handle. Finish by adding a tiny green candy stem or a bit of green icing on top to mimic pumpkin stems.
Enjoy them the same day for the best texture—fresh, sticky, and just a little gooey. They’re perfect for grabbing between trick-or-treats or a quick festive snack.
Mistakes and Fixes
- FORGOT to grease the pan? Rub a little butter or spray on the pan before pouring—prevents sticking.
- DUMPED too many marshmallows? Add a handful of cereal to balance the sweetness and prevent stickiness.
- OVER-TORCHED marshmallow mixture? Lower heat and stir faster—browned marshmallow can taste burnt.
- FAILED to shape? Let the mixture cool slightly longer before handling—it’s less sticky then.
Quick Kitchen Fixes for Common Problems
- When treats are too sticky, dust with a little powdered sugar or cornstarch.
- Splash a tiny bit of vanilla or almond extract into the melted marshmallow for extra warmth.
- Patch cracked treats with a dab of melted white chocolate or icing.
- Shield your treats with a light dusting of cocoa powder if they look too shiny or oily.
- In a pinch, swap cereal for crushed graham crackers for a richer taste and softer bite.
These pumpkin rice krispie treats are such a simple way to bring a little bit of seasonal joy to your table. They’re not just cute—they’re also a reminder that sometimes, the best moments come from quick, imperfect bites. No matter how you shape or color them, they’ll get smiles and maybe a few giggles.
Pumpkin Rice Krispie Treats
Equipment
- Large saucepan
- Spatula
- 9x13 inch pan
- Parchment paper
- Small cookie cutters or hands
- Decorating tools (optional)
Ingredients
- 4 tablespoons unsalted butter for melting and mixing
- 10 oz mini marshmallows for a fluffy, sticky texture
- 6 cups Rice Krispies cereal classic crispy rice cereal
- few drops orange gel food coloring to achieve a vibrant pumpkin hue
- optional chocolate chips or icing for decoration and pumpkin stems
Instructions
- Lightly grease your pan or line it with parchment paper to prevent sticking.
- Melt the butter in a large saucepan over medium heat, listening for a gentle bubbling as the butter melts completely and begins to smell warm and buttery.
- Add the mini marshmallows to the melted butter, stirring constantly with a spatula. Continue until the marshmallows are fully melted and the mixture is smooth, bubbling softly and smelling sweet.
- Remove the pan from heat and add a few drops of orange gel food coloring. Stir quickly to evenly tint the mixture to a bright, pumpkin orange—this will make your treats cheerful and festive.
- Immediately fold in the rice cereal, stirring gently until each piece is coated in the sticky orange mixture. The mixture should be thick and gooey, with a vibrant hue.
- Pour the mixture into your prepared pan. Use a spatula or buttered hands to press it down evenly, smoothing the surface. Let it sit for about 10 minutes to set and firm up.
- Once cooled, gently lift the block of treats from the pan using the parchment paper or by flipping it onto a cutting board. Cut into small squares or use cookie cutters to shape mini pumpkins.
- Shape each square into a tiny pumpkin by pinching the top to create a small bump or stem. Decorate with chocolate chips for eyes and a nose, or add a tiny green icing stem for extra charm.
- Let the shaped treats sit at room temperature for at least 30 minutes, allowing them to firm up and making them easier to handle. Add a small green candy stem or dots of icing to mimic pumpkin stems.
- Enjoy your adorable and festive pumpkin rice Krispie treats—perfect for Halloween parties or a seasonal snack that’s both fun and delicious!


