TITLE: How to Make a Halloween Spider Cheese Ball That Will Spook and Delight
OUTRO: There’s something about shaping a cheese ball into a creepy crawler that sparks a little chaos on the table. It’s imperfect, a bit goofy, but totally memorable. When guests spot those googly eyes and squiggly legs, they can’t help but smile—sometimes even giggle. This isn’t just a snack; it’s a little bit of Halloween mischief wrapped in cheesy goodness.
In the end, it’s about having fun with familiar flavors, turning them into something unexpectedly playful. The process might look simple, but the joy comes from the details—the googly eyes, the spider legs, the way everyone reacts. So, gather your ingredients, embrace the mess, and get ready to surprise everyone with this creepy, cheesy creature.
What I Love About This Spooky Cheese Ball
- Seeing the kids’ faces light up when they spot the spider crawling across the platter. Pure joy mixed with a bit of squeamish delight.
- Getting a little messy in the kitchen—because sometimes the best ideas come from playful chaos and a splash of melted cheese.
- That moment when the cheese mixture comes together, smelling cheesy and herby, just before shaping it into something alive.
- Using simple store-bought ingredients but transforming them into a conversation starter—who knew cheese could be so creepy?
- Feeling proud when everyone asks, “How did you make that?” and you get to say, “Just a little kitchen trickery.”
Ingredient Breakdown: What’s Behind the Creepy Charm
- Cream cheese: I like it soft and tangy, with a silky texture that holds together well. Swap with goat cheese for a sharper bite if you prefer.
- Shredded cheddar: Melts nicely and adds that cheesy punch. Use a smoked variety for depth, or a blend for a more complex flavor.
- Herbs (parsley, chives): Fresh and vibrant, brightening the mix. Dried herbs won’t give the same punch, but are fine in a pinch.
- Olives: Pitted black olives add a salty, briny kick. For a milder look, swap with roasted red peppers, but keep the flavor punch.
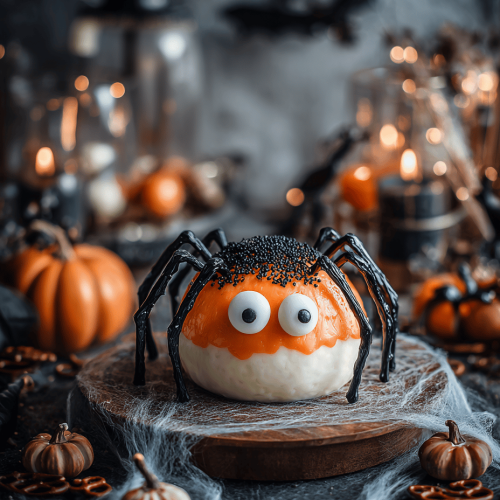
- Cheese legs and eyes: Use sliced almonds or pretzel sticks for the legs—crunchy and easy to shape. For eyes, small dollops of cream cheese or black olives work great.
- Spooky decorations: Plastic spiders or candy eyes—just make sure they’re food-safe if you’re serving to kids.
Step-by-Step: Crafting Your Creepy Cheese Creature
Equipment & Tools
- Mixing bowls – for blending the cheese base
- Rubber spatula – scraping and mixing
- Plastic wrap – shaping and chilling
- Small knife or toothpick – for detail work
- Serving platter – display your creepy crawler
Steps
- Combine 8 oz cream cheese and 1 cup shredded cheddar in a bowl. Mix until smooth and slightly fluffy. If too stiff, microwave 10 seconds and stir again.
- Chop 2 tbsp fresh herbs (parsley, chives) and fold into the cheese mixture. Smell that herby brightness.
- Add a pinch of salt and pepper; taste and adjust. You want a balanced, cheesy flavor with a hint of freshness.
- Shape the mixture into a rough ball, then transfer to a piece of plastic wrap. Form into a larger sphere, smoothing the surface. Chill for 30 minutes.
- While chilling, prepare the legs: break pretzel sticks or sliced almonds into 4-6 inch lengths. Set aside.
- Once firm, carefully mold the cheese into a spider shape—flatten slightly for the body, attach legs with a dab of cheese, pressing gently.
- Use a small knife or toothpick to create tiny indentations for eyes. Attach small dollops of cream cheese or place candy eyes. Position the legs evenly around the body.
- Place on a serving platter. Add plastic spiders or other decorations for extra creepiness.
Rest & Finish
Let the assembled cheese spider rest in the fridge for another 15-20 minutes so everything sets. Serve with crackers and sliced veggies for a spooky spread.
How to Know It’s Done
- The cheese should be firm but not hard—press gently, it jiggles slightly.
- The legs stay attached without sagging or cracking.
- The eyes are securely in place, with no wobbling or sliding off.
Mistakes and Fixes You’ll Want to Know
- FORGOT to chill the cheese shape? Pop it back in the fridge for 10 minutes to firm up.
- DUMPED too much herbs? Scrape out excess and add more cheese or cream cheese to balance.
- OVER-TORCHED the cheese legs? Soften with a quick microwave blast and reattach carefully.
- SKIPPED the plastic wrap? The shape may be misshapen; wrap tightly and chill again for better form.
Quick Kitchen Fixes for Spooky Surprises
- When legs crack, splash a tiny bit of warm cheese mixture and press gently to reattach.
- When the eyes slide off, shield them with a dab of extra cream cheese or a tiny dot of mustard.
- If cheese mixture is too soft, fold in more shredded cheese and chill longer.
- When decorations look dull, brush with a little edible shimmer or sprinkle with paprika for shimmer and color.
- For a quick rescue, stash in the freezer for 5 minutes if it’s too soft to handle.
OUTRO: This Halloween spider cheese ball isn’t about perfect presentation—it’s about the fun of creating something a little creepy, a little cheesy, and totally unexpected. The best part? Watching everyone’s surprise when they realize it’s edible. It’s imperfect, chaotic, and utterly memorable—just like a good party should be.
Sometimes the simplest ingredients, when shaped into something playful, become the highlight of the night. No matter how your spider turns out, it’ll get everyone talking and giggling. And honestly, that’s what makes kitchen adventures like this worth every messy, cheesy second.
Halloween Spider Cheese Ball
Equipment
- Mixing bowls
- Rubber spatula
- Plastic wrap
- Small knife or toothpick
- Serving platter
Ingredients
- 8 oz cream cheese softened
- 1 cup shredded cheddar cheese
- 2 tbsp fresh herbs parsley, chives, chopped
- 2 tbsp black olives pitted, for eyes
- 4-6 inch pretzel sticks for legs
- small candy eyes or cream cheese for eyes
- optional plastic spiders or decorations for extra creepiness
Instructions
- Place softened cream cheese and shredded cheddar in a mixing bowl. Use a rubber spatula to blend until smooth and creamy, with no lumps remaining.

- Chop fresh herbs like parsley and chives finely, then fold them into the cheese mixture. The herbs will add a bright, herby aroma and flavor.

- Add a pinch of salt and pepper, then taste the mixture and adjust seasoning as needed. The flavor should be balanced, cheesy, and fresh.
- Scoop the mixture onto a piece of plastic wrap and shape it into a rough sphere. Wrap tightly and gently mold into a larger, smooth ball to resemble the spider's body. Chill in the refrigerator for about 30 minutes to firm up.
- While the cheese firm up, break pretzel sticks or sliced almonds into 4-6 inch lengths to create spider legs. Arrange them nearby for easy assembly.
- Remove the chilled cheese ball from the fridge and carefully mold it into a spider shape by flattening slightly for the body. Attach the legs around the body using small dabs of cheese or pressing the pretzels into the surface gently.
- Use a small knife or toothpick to make tiny indentations for the eyes on the front of the spider. Place small dollops of cream cheese or small candies like candy eyes into these indentations for a spooky effect.
- Arrange the legs evenly around the body, pressing gently to ensure they stay in place. Place the completed spider on a serving platter.
- Decorate with plastic spiders or other Halloween-themed decorations for extra creepiness. Chill for another 15-20 minutes to set everything in place.
- Serve the cheese spider with crackers, sliced vegetables, or breadsticks for a fun, spooky appetizer that’s sure to delight guests.


