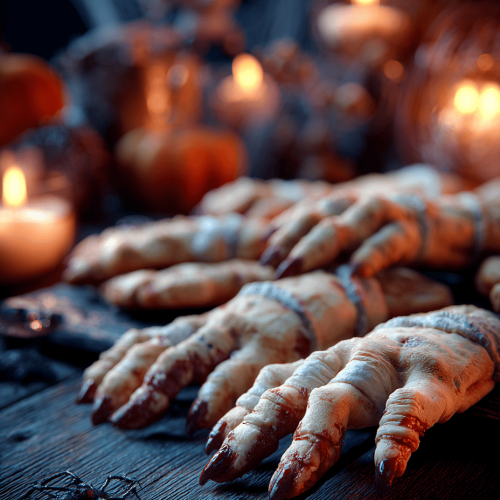
Ever since I first saw those creepy little finger cookies, I couldn’t get them out of my head. It’s not just about the spooky look — it’s how they crunch when you bite into them, revealing that perfect almond “nail,” and the way the dough smells like toasted almonds and butter. They’re weird, charming, and somehow nostalgic, like a Halloween craft that’s turned edible.
But what really makes these cookies special is their unpredictable charm. Sometimes they crack just a little too much, sometimes the “nails” fall off, but that’s part of the fun. Making these feels like a little ritual — a messy, giggly, slightly chaotic one — that reminds me of childhood Halloweens and the thrill of a good scare.
Why I Love These Ghoulish Little Fingers
- They turn baking into a mini Halloween horror scene — creepy, funny, and totally satisfying.
- Seeing the faces of friends and family when they realize what they’re biting into — priceless.
- It’s a perfect mix of simple ingredients and playful shaping, no fancy tools needed.
- Every broken “nail” and cracked knuckle just adds to their character — I love the imperfections.
- They make me nostalgic for childhood, when spooky treats felt like magic more than effort.
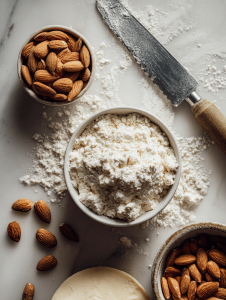
Ingredient Breakdown — What Makes These Fingers So Special?
- Unsalted butter: I swear by softened butter—makes the dough silky and easy to shape. Swap with margarine if you must, but it’s not quite the same.
- Almond extract: Adds that eerie, nutty aroma that makes the “nails” look more real. Lemon zest could work for a brighter twist.
- All-purpose flour: The backbone of the dough—sturdy enough to hold shape but tender enough to crack. Use gluten-free blend if needed, but expect slight texture changes.
- Egg: Binds everything together, giving the cookies that slight chew. No eggs? Try a flaxseed egg, but the texture might be a touch denser.
- Slivered almonds: For the nails — they should be oozing with a smoky crunch. You can use sliced almonds if you’re in a pinch, but the slivers look way creepier.
- Red food coloring: Just a tiny dab for that bloody, freshly-gnawed look—don’t go overboard, or they’ll look cartoonish.
Making the Creepy Little Fingers — Step-by-Step
Equipment & Tools
- Mixing bowls — to combine ingredients.
- Silicone spatula — for folding and scraping.
- Baking sheet — lined with parchment, to prevent sticking.
- Small knife — for shaping and scoring.
- Almond slivers — for nails.
Steps
- Preheat your oven to 175°C (350°F). Line a baking sheet with parchment.
- In a bowl, beat softened butter with sugar until creamy — about 2 minutes.
- Mix in the egg and almond extract, then stir in the flour until dough forms. It should be firm but pliable.
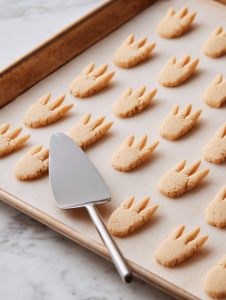
- Divide dough into small portions, about the size of a walnut. Roll into finger shapes, tapering at one end.
- Use your finger to make knuckles and slight cracks — these will give the fingers a realistic look.
- Insert a slivered almond at the tip for the nail; dab a tiny bit of red food coloring for blood if you like.
- Place the fingers on the baking sheet, leaving space. Bake for 15–18 minutes, until golden and cracked.
- Let cool slightly. For extra creep, press a tiny drop of red icing around the nail base.
Resting & Finishing
Cool the cookies on a wire rack. They taste best within a day, when the cracks are prominent and the nails sharp. If you want extra blood, dab a little red gel here and there for a freshly-gnawed effect.
Checkpoints & How to Know It’s Done
- They should be golden around the edges, with cracks and a firm but slightly crumbly texture.
- Touch the tips — the almonds should stay put, not fall off easily.
- They’ll smell rich and toasted, with a hint of almond and butter in the air.
Mistakes and Fixes — Beware the Creepy Little Fingers Gone Wrong
- FORGOT to chill the dough? It’ll be too soft to shape. Chill for 15 minutes before baking.
- OVER-TORCHED the cookies? They’ll be bitter and hard. Remove when they’re just golden, not dark.
- NEVER pressed the almond nails firmly enough? They’ll fall off. Use a tiny dab of icing as glue.
- DUMPED in too much red coloring? They’ll look cartoonish. Use a light hand for a bloody touch.
Quick Kitchen Fixes for Creepy Fails
- When cookies spread too much, chill the shaped dough for 10 minutes before baking.
- Splash a little milk or water on cracked dough to smooth edges mid-shaping.
- Patch cracks with a tiny bit of icing; they hide imperfections and add a bloody effect.
- Shield delicate nails with a sprinkle of powdered sugar if they look too brittle.
- If your almonds slide off, rescue with a dab of royal icing—quick and effective.
Creepy Little Finger Cookies
Equipment
- Mixing bowls
- Silicone spatula
- Baking sheet
- Parchment paper
- Small knife
- Toasting oven or regular oven
Ingredients
- 1 cup unsalted butter softened
- 1/2 cup granulated sugar
- 1 large egg
- 1 teaspoon extract almond extract
- 2 1/2 cups all-purpose flour
- 1/4 cup slivered almonds for nails
- a few drops red food coloring red food coloring for blood effect
Instructions
- Preheat your oven to 175°C (350°F) and line a baking sheet with parchment paper.
- In a mixing bowl, beat the softened butter and sugar together until the mixture is fluffy and pale, about 2 minutes. You’ll notice it becomes creamy and slightly light in color.
- Add the egg and almond extract to the bowl, mixing until fully incorporated. The dough will start to come together with a rich aroma of almonds filling your kitchen.
- Gradually stir in the flour, folding it in until a firm, pliable dough forms. It should hold together but remain soft enough to shape easily.
- Divide the dough into small portions, about the size of a walnut, and roll each into a tapered finger shape. Slightly flatten the top to resemble knuckles.
- Use your finger or the back of a small knife to make subtle cracks along the surface of each finger, mimicking knuckles and cracked skin texture.
- Place a slivered almond at the tip of each finger to resemble a creepy nail. Dab a tiny amount of red food coloring around the base for a bloody effect, if desired.
- Arrange the fingers on the prepared baking sheet, leaving space between each to allow for spreading. Bake for 15–18 minutes, or until golden and cracked.
- Once baked, let the cookies cool slightly on the sheet. For extra gore, dab a tiny bit of red icing around the nail base for a bloody effect.
- Transfer the cookies to a wire rack to cool completely. The cracks will deepen and the almond nails will become crisp, giving them a realistic, creepy appearance.
- Enjoy these crunchy, spooky finger cookies that are perfect for Halloween parties or any creepy celebration. Their imperfection and crunch make them irresistibly charming and fun to serve!


