Why I Love Making These Creepy-Cute Treats
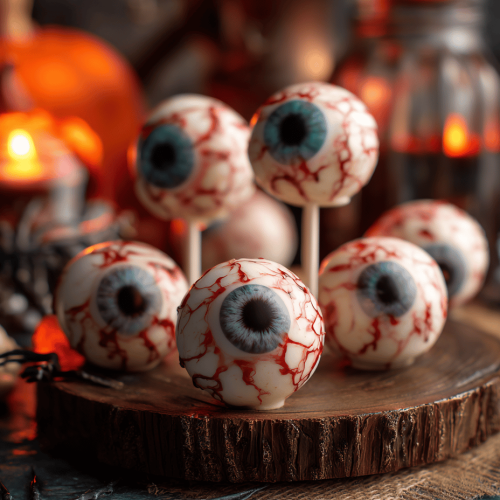
There’s a weird joy in turning something familiar like a cake pop into a tiny, unsettling eyeball. I love how the process lets you embrace a little chaos—smudgy red veins, glossy eyes, all of it. Plus, they’re such a hit at parties, sparking surprised squeals and giggles every time.
Honestly, these cake pops remind me of childhood Halloweens, when dressing up and making spooky snacks felt like a secret mission. They’re not perfect—sometimes the eyeballs wobble or the bloodshot veins smear—but that’s part of the charm. It’s about having fun, not about pristine presentation.
Making these has become a bit of a ritual for me, a way to celebrate the season with a little messy, playful magic. They’re simple enough to whip up last minute, but impressive enough to make your spooky spread stand out. And let’s be real—no one can resist a creepy, edible eyeball.
What I Love About This Recipe
- I get a kick out of how easily you can customize the “eyeballs” with different colors or sizes—creepy or cute, your call.
- There’s a wonderful chaos in decorating each one—tiny veins, glossy pupils, and gooey bloodshot details—no two are alike.
- Watching the chocolate glaze set into a shiny, veiny shell is oddly satisfying, like a mini magic trick.
- Sharing these with friends feels like a little secret, a bit of spooky art that everyone devours in seconds.
- They remind me how playful baking can be, especially when you let go of perfection and just have fun.
Ingredient Breakdown: What Makes These Monsters tick
- Chocolate chips: I use semi-sweet chocolate because it melts smoothly and isn’t overly sweet. Swap in dark chocolate if you want a richer, less sugary flavor—just be cautious with the melting time, it burns easily.
- Cake crumbs: Leftover cake? Perfect. If not, a store-bought pound cake works. Crumble it fine, but leave some chunks for texture—makes the eyeballs more interesting.
- Cream cheese: Adds richness and helps the cake ball hold shape. If dairy-free, try coconut cream, but the texture will be slightly different—less firm, more tender.
- Red gel food coloring: For bloodshot veins and sinister accents. Use sparingly; a little goes a long way to keep things spooky but natural-looking.
- White chocolate or candy coating: For the glossy eyeball shell. White chocolate is my favorite—just watch the heat so it doesn’t seize. If you want a sheen that’s less fragile, a candy coating is easier to work with.
The Step-by-Step Guide to Crafting Your Creepy Creatures
Equipment & Tools
- Silicone or plastic cake pop molds (or freehand if you prefer a messier look) to shape the eyeballs.
- Double boiler or microwave-safe bowl for melting chocolate.
- Small piping bag or toothpick for veins and bloodshot details.
- Cooling rack for drying and setting the coating.
- Food-safe paintbrush for fine veins or tiny blood vessels.
Steps
- Start by crumbling your cake into a large bowl. Mix in softened cream cheese until the mixture holds together—about 2-3 minutes of kneading.
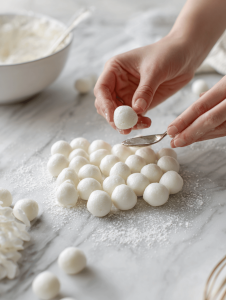
- Roll into small, smooth balls about the size of a walnut. Chill in the fridge for 30 minutes—firmness makes coating easier.
- While chilling, melt your chocolate in a double boiler or microwave at 30-second bursts, stirring until smooth and glossy. Keep the temp around 45°C (113°F)—don’t overheat or it will seize.
- Dip each cake ball into the melted chocolate, allowing excess to drip off. Place on a parchment-lined tray. Chill again for 15 minutes until the shell is set.
- Once firm, gently dip the balls in white chocolate or candy coating for the eyeball shell. Use a toothpick or skewer to help smooth out any uneven spots. Let set for 10 minutes.
- To create the bloodshot effect, use a piping bag or toothpick to draw veins with red gel. For the iris, add a small dot of black or dark brown, then a tiny white highlight for realism. Use a fine brush for veins if you want detail.
- Finish by adding a glossy glaze if desired—warm a little white chocolate and lightly brush over the eyeballs for extra shine. Chill briefly before serving.
- The coating is shiny and firm—no sticky spots.
- Veins and details are dry and slightly raised.
- The eyeballs wobble slightly but hold shape when gently touched.
- FORGOT to chill the cake balls? Pop them back in the fridge for 15 minutes—cold helps coating stick better.
- OVER-TORCHED the chocolate? Re-melt with a splash of vegetable oil to smooth out the shine.
- DUMPPED veins on the wrong side? Use a damp toothpick to gently reposition or re-draw veins.
- FAILED to set the coating? Chill longer or increase room humidity to prevent sweating.
- When coating is too thick, splash in a tiny bit of coconut oil to loosen it up.
- When veins bleed too much, patch with a dab of white chocolate for clean lines.
- Shield delicate details with a light dusting of edible glitter for a shimmer that distracts from imperfections.
- If eyes look dull, brush a tiny amount of clear edible glaze for a wet, realistic look.
- For a quick rescue, use a damp sponge to remove smudges or stray veins—less mess, more creepy.
- Silicone or plastic cake pop molds
- Double boiler or microwave-safe bowl
- Piping bag or toothpick
- Cooling rack
- Food-safe paintbrush
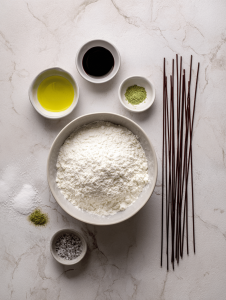
- 2 cups cake crumbs leftover cake or pound cake crumbled finely
- 4 oz cream cheese softened
- 1 cup semi-sweet chocolate chips for melting
- 1 cup white chocolate or candy coating for coating the eyeballs
- 1 tsp red gel food coloring for veins
- Black or dark brown small dot of black or dark brown food coloring for irises
- Small white highlight dots tiny white dots for realism
- Crumble the cake into a large bowl until fine, then mix in softened cream cheese using a spatula or your hands until well combined and the mixture is cohesive.
- Shape the mixture into small, smooth balls about the size of a walnut and place them on a parchment-lined tray. Chill in the fridge for about 30 minutes to firm up.
- Meanwhile, melt the chocolate chips in a double boiler or microwave in 30-second bursts, stirring until smooth and glossy. Let it cool slightly but keep it fluid.
- Dip each chilled cake ball into the melted chocolate, turning to coat completely. Tap off excess and place on a parchment-lined tray. Chill again for 15 minutes until the shell is set.
- Once firm, melt the white chocolate or candy coating similarly and dip each ball to create a shiny, white eyeball shell. Use a toothpick or skewer to help smooth any uneven spots and let set for about 10 minutes.
- Use a piping bag or toothpick dipped in red gel to draw bloodshot veins on each eyeball, creating a creepy bloodshot effect. Then, add a small dot of black or dark brown for the iris, and a tiny white highlight for realism.
- If desired, lightly brush a warm, melted white chocolate layer over the eyeballs for a glossy, wet look. Chill briefly to set the glaze.
- Allow the eyeballs to rest at room temperature for about 10 minutes, then arrange them on a spooky platter. Add fake cobwebs or small plastic spiders for extra Halloween flair and enjoy these creepy treats!
Rest & Plate
Let the eyeballs rest at room temperature for 10 minutes before arranging on a spooky platter. Add fake cobwebs or plastic spiders for extra effect. They’re best enjoyed within a few hours, as the coating can soften over time.
How to Know It’s Done
Mistakes and Fixes
Quick Kitchen Fixes
Building these monster eyeballs is a little chaotic, but that’s part of the fun. The smell of melting chocolate, the sight of glossy whites, and the tactile feel of squishy cake balls make it all worth it. Perfect for last-minute spooky surprises or just a playful kitchen experiment, they bring a little gross-out delight to any Halloween spread.