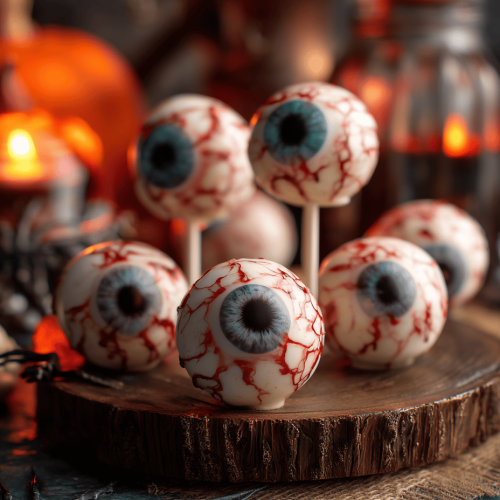
Imagine biting into a sweet, creamy cake pop only to be greeted by a squishy, oozing eyeball staring back at you. These cake pops aren’t just for kids; they’re a little mischievous, a little spooky, and surprisingly easy to pull off with a little patience. I love how they turn a simple cake mixture into tiny, grotesque marvels that make everyone giggle and shudder at once.
Making these eyeball cake pops is about embracing the chaos. You’ll get your hands sticky, wipe away a few smudges of red food gel, and maybe even squeal at the sight of your first perfect eyeball. They’re perfect for a last-minute party, a classroom project, or just a fun way to get into the Halloween spirit. The best part? You can customize the “irises” with all sorts of colors and patterns, making each one uniquely creepy.
Why I Can’t Get Enough of These Ghoulish Goodies
- Watching kids’ eyes light up when they see these creepy little eyeballs always gets me smiling, no matter how tired I am.
- There’s something oddly satisfying about turning simple ingredients into a gooey, spooky masterpiece.
- These cake pops are chaos on a stick — messy, hilarious, and totally worth the cleanup.
- Every batch feels like a tiny victory, especially when you nail that perfect “bloodshot” look.
- They remind me of childhood Halloweens, where a little fright mixed with sweetness was all you needed.
Ingredient Breakdown — What Makes These Eyeballs Pop
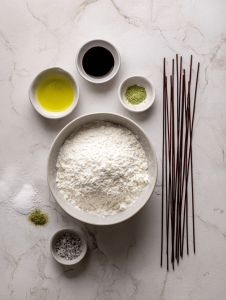
- Cake crumbs: I use leftover vanilla or chocolate cake, crumbled fine—no dry bits. Feel free to swap with sponge cake or even brownies for a richer look.
- Cream cheese: Adds richness and helps mold the mixture into firm, sticky balls. If dairy’s an issue, mashed banana works but less stable.
- Chocolate coating: Melts smoothly, giving a shiny, slick surface. You can use white chocolate for a ghostly base, or dark for a more sinister vibe.
- Food gel or edible ink: For the irises and bloodshot veins—bright, vivid, and easily adjustable for different creepy effects.
- Red food coloring: For bloodshot veins or bleeding eyeballs—start with a few drops and build up for intensity.
- Toothpicks or sticks: To hold everything together, especially when dipping and decorating—choose sturdy, sharp ones for neatness.
- Vanilla or almond extract: Adds subtle flavor to the cake balls—skip if you prefer plain.
Step-by-Step Guide to Creating Freakishly Realistic Eyeballs
Equipment & Tools
- Mixing bowls: For blending cake crumbs and filling.
- Silicone or metal scoop: To portion out even-sized balls.
- Cooling rack: To set dipped cake pops without sticking.
- Double boiler or microwave-safe bowl: For melting chocolate.
- Food coloring and fine-tipped brushes: For detailed iris and vein work.
- Toothpicks or cake pop sticks: To handle and decorate.
Steps
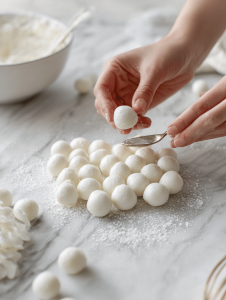
- Crumb your leftover cake fine, then mix in enough softened cream cheese until it’s moldable but not sticky. Think play-doh consistency.
- Portion into small balls, about the size of a walnut. Use a scoop for even sizes.
- Insert a toothpick or cake pop stick into each ball. Chill in the fridge for 30 minutes until firm and cold.
- Melt your chocolate in a double boiler or microwave, stirring until smooth. Aim for a shiny, fluid consistency.
- Dip each chilled cake ball into the chocolate, swirling gently to coat evenly. Let the excess drip off.
- Place on a cooling rack. If you want bloodshot veins, quickly pipe red gel onto the wet coating before it sets.
- Use a fine brush or toothpick to add irises and pupils with food gel—think vivid blues, greens, or unsettling reds.
- For a bloodshot effect, pipe fine red lines radiating from the iris outward, or add a small drip for extra gore.
- Let the chocolate set at room temp or in the fridge for about 15 minutes. They should be shiny and firm to the touch.
Resting & Finishing
Once set, let the eyeballs sit at room temp to avoid condensation. Stick them on a platter or in a foam block for display. They’re best eaten within 24 hours, when everything stays fresh and glossy.
How to Know It’s Done
- Chocolate coating is shiny and firm — no sticky or dull spots.
- Irises and veins are detailed but not smudged — use a steady hand.
- When gently pressed, the cake ball feels firm but not hard, with a slight give.
Mistakes and Fixes That Won’t Send You Screaming
- FORGOT to chill the cake balls before dipping? Pop them back in the fridge for 15 minutes—cold is key.
- DUMPED too much red gel? Wipe with a damp paper towel before it dries—less is more here.
- OVER-TORCHED your chocolate? Re-melt with a splash of vegetable oil to loosen it up.
- FAILED to get the veins right? Use a fine-tipped brush dipped in gel—layer gradually for realism.
Quick Kitchen Fixes & Hacks for Instant Creepy Success
- When chocolate cracks, splash in a tiny bit of coconut oil—crackle gone, smooth again.
- When the irises look dull, patch with a dab of bright food gel for a pop of color.
- When veins smudge, shield with a light dusting of powdered sugar—acts like a barrier.
- When the coating isn’t shiny enough, dry with a hairdryer on low—shimmer instantly.
- When you’re in a pinch, swap out gel for edible markers—less mess, more control.
Eyeball Cake Pops
Equipment
- Mixing bowls
- Silicone or metal scoop
Ingredients
- 2 cups crumbled cake vanilla or chocolate flavor
- 4 oz cream cheese softened
- 12 oz dark or white chocolate for melting
- assorted food gel or edible ink for irises and veins, bright colors recommended
- few drops red food coloring for bloodshot veins
- 12 pcs cake pop sticks or toothpicks sturdy and sharp
Instructions
- Crumb your leftover cake finely in a large bowl, then add softened cream cheese and mix until the mixture is dense but pliable, like play-doh.
- Use a scoop to portion out small, even-sized balls about the size of a walnut, then roll them gently between your palms to smooth out the shape.
- Insert a cake pop stick or toothpick into each ball, then place the balls on a tray and chill in the fridge for 30 minutes until firm and cold.
- While they chill, melt your chocolate in a double boiler or microwave, stirring until smooth and shiny.
- Dip each chilled cake ball into the melted chocolate, swirling gently to coat evenly, then let the excess drip off.
- Place the coated cake balls on a cooling rack, and while the chocolate is still wet, pipe red gel onto the surface to create bloodshot veins or add small drips for gore.
- Use a fine-tipped brush or toothpick dipped in food gel to draw irises and pupils in vivid colors, positioning them carefully for a creepy, realistic effect.
- Add small red lines radiating from the iris or tiny blood drips with gel to enhance the bloodshot look, layering as needed for depth.
- Allow the chocolate to set at room temperature or in the fridge for about 15 minutes until shiny and firm to the touch.
- Once set, remove the eyeballs from the rack, and if desired, stick them on a platter or foam block for display. Enjoy their creepy, glossy look and gooey interior.


