Why I Love This Recipe: A Small Horror in My Kitchen
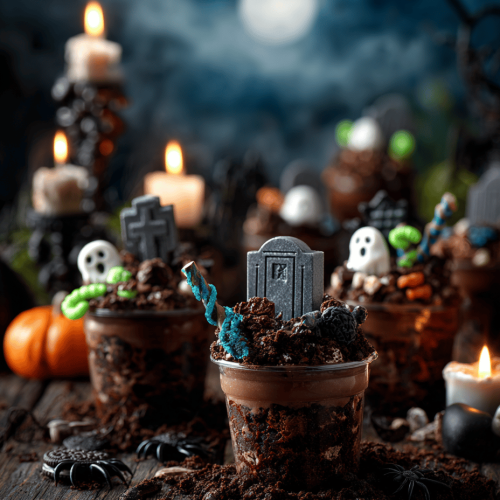
There’s something oddly satisfying about creating a dessert that looks like a tiny graveyard. It’s messy, chaotic, and a little creepy, but totally charming. When I first made these pudding cups, I loved watching kids’ eyes light up at the “tombstones” and “dirt” spilling over the edges.
This recipe isn’t about perfection—it’s about the joy of sneaking a little spooky fun into something familiar. I find myself giggling at the goofy little gravestones and the gooey chocolate “dirt.” Plus, it’s a no-bake, quick fix that lets me focus on the creepy details rather than fussing in the kitchen.
What I Truly Like About This Halloween Graveyard Pudding
- I love how easy it is to customize—make it more ghoulish or cute, depending on your vibe.
- The contrast of rich chocolate and bright candy eyes always sparks nostalgic memories of childhood Halloweens.
- It’s chaos-friendly—kids can help decorate and get a little messy, which is half the fun.
- Seeing everyone’s surprise when they dig into the “dirt” and find tiny tombstones buried inside makes me grin.
- It’s a perfect little project for a quick holiday treat, especially when you’re short on time but want impact.
Ingredient Breakdown: What Makes This Graveyard Fancy?
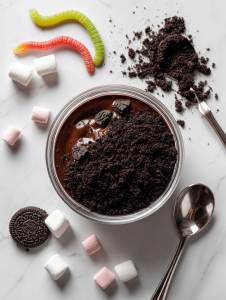
- Pudding mix: I prefer using instant chocolate pudding for that smooth, creamy base. Use vanilla if you want a lighter look, but chocolate feels more like real dirt.
- Graham cracker crumbs: I crush them myself for a fresh, slightly chunky dirt effect—no processed stuff here. Swap for Oreo crumbs if you want extra richness and a darker hue.
- Candy eyes: These tiny, creepy accessories add a punch of personality. If you can’t find them, mini M&Ms or jelly beans work, just keep the eyes shape in mind.
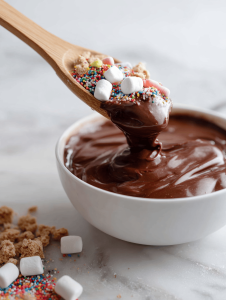
- Chocolate melts or ganache: I melt good-quality chocolate until glossy and dark, then drizzle for tombstones and dirt. If you’re short on time, a spoonful of Nutella works, too.
- Gummy worms or spiders: I love tucking these in for that slithering, unsettling vibe. Swap with licorice if you prefer a more restrained look or want to avoid sticky messes.
Step-by-Step: How to Bring This Creepy Scene to Life
Equipment & Tools
- Small clear cups—show off the layers and dirt effect.
- Mixing bowls—one for pudding, one for melting chocolate.
- Whisk or spoon—get that pudding smooth and chocolate glossy.
- Crushing tool—use a rolling pin or food processor for crumbs.
- Decorating tweezers or toothpicks—precise tombstone placement.
Steps
- Prepare the pudding: whisk instant chocolate pudding mix with cold milk as per package—about 5 minutes until thick. Chill briefly if needed.
- Crush graham crackers: place in a zip-top bag and bash with a rolling pin, aiming for coarse crumbs. Set aside.
- Melt chocolate: microwave in 20-second bursts, stirring each time, until smooth and shiny, about 1 minute total. Let cool slightly.
- Assemble cups: spoon a layer of pudding at the bottom, then sprinkle a generous handful of crumbs for dirt. Repeat layers if space allows.
- Decorate: press tombstone shapes (or cut cardboard) into the pudding, add candy eyes, gummy worms, or spiders. Drizzle melted chocolate on top for extra dirt and tombstone accents.
- Let set: refrigerate for at least 30 minutes. The chocolate will firm up, keeping decorations in place.
Resting & Finishing
Keep the cups chilled until just before serving. If you want a fresher look, add extra crumbs or decorations right before serving. The chocolate will crackle a bit when it cools, adding to the spooky vibe.
Checkpoints & How to Know It’s Done
- The pudding should jiggle slightly but hold its shape when gently shaken.
- The chocolate drizzle should be firm and glossy, not sticky or runny.
- The decorations should stay in place when lightly touched.
Mistakes and Fixes: Keep Your Cemetery Creepy and Cute
- FORGOT to chill the pudding: It can be runny. Fix by refrigerating for 15 more minutes before decorating.
- DUMPED too much graham crumbs: It becomes a crumbly mess. Tap out excess, then add a little pudding to moisten.
- OVER-TORCHED the chocolate: It turns grainy. Use a double boiler or microwave in short bursts next time.
- SPILLED candy eyes: Use a damp toothpick to reposition or gently lift and replace.
Quick Kitchen Fixes for Creepy Disasters
- When chocolate cracks, splash a little warm cream or coconut oil to smooth it out.
- Patch gummy worm tears with a tiny dab of melted chocolate—shimmering, gooey disguise.
- When crumbs look dull, dust them with a pinch of cocoa powder for extra depth.
- When decorations fall off, shield with a small dollop of pudding or chocolate glue.
- When the whole thing looks too messy, sprinkle a light layer of extra crumbs or crushed cookies for a fresh dirt look.
All in all, these graveyard pudding cups are a little chaos, a little sweetness, and a lot of creepy fun. They’re perfect for parties, classroom treats, or just a sneaky way to add some spooky to your usual dessert rotation. Sometimes, the best part is the little mess and the goofy smiles that come with it.
Halloween Graveyard Pudding Cups
Equipment
- Small clear cups
- Mixing bowls
- Whisk or spoon
- Zip-top bag or food processor
- Microwave-safe bowl
- Decorating tweezers or toothpicks
Ingredients
- 1 package instant chocolate pudding mix
- 2 cups cold milk for pudding
- 1 cup graham cracker crumbs crushed coarsely for dirt effect
- 12 pieces candy eyes tiny, creepy decorations
- 0.5 cup melted chocolate or ganache for drizzle and tombstones
- 6 gummy worms gummy worms or spiders for creepy accents
Instructions
- Whisk the instant chocolate pudding mix with cold milk in a mixing bowl for about 5 minutes until thick and smooth, then set aside to chill briefly.
- Crush the graham crackers in a zip-top bag with a rolling pin until you reach coarse crumbs that resemble dirt, then set aside.
- Microwave the chocolate in short bursts, stirring each time, until glossy and smooth—about 1 minute total. Let it cool slightly so it doesn't melt your decorations.
- Layer the pudding into clear cups, spooning a generous layer at the bottom, then sprinkling a handful of graham cracker crumbs on top to mimic dirt. Repeat the layers if your cups are tall enough.
- Press tombstone shapes or small cutouts of cardboard into the pudding, then decorate with candy eyes, gummy worms, or tiny spiders. Drizzle melted chocolate around for extra dirt and spooky accents.
- Refrigerate the cups for at least 30 minutes, allowing the chocolate to firm up and decorations to stay in place. Keep chilled until ready to serve for best results.


