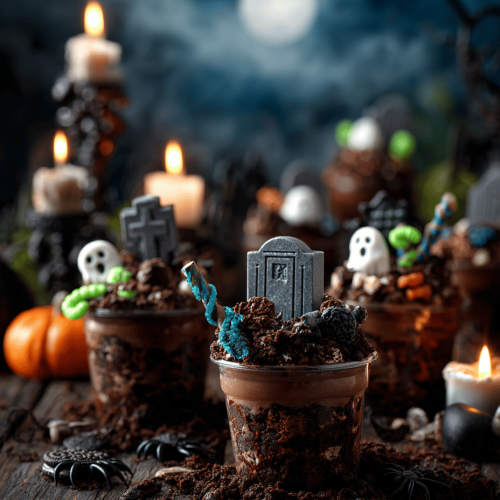
When I first stumbled upon the idea of transforming simple pudding cups into creepy, crawly graveyards, I knew I had a Halloween hit on my hands. It’s a fun and mischievous way to turn an everyday treat into a spooky spectacle—no oven required, just a handful of ingredients, a dash of creativity, and a little patience. This project is perfect for busy kitchens, playful kids, or anyone looking to add a touch of haunted charm to their dessert table. The instant gratification of watching these “tombs” come together makes it even more rewarding.
This isn’t just about Halloween candy or spooky aesthetics; it’s a chance to get a little messy, a little silly, and a lot nostalgic. I love how the crushed cookies mimic dirt, giving the scene a realistic feel, while gummy worms wriggling out of the cups add a playful, creepy touch. It’s a reminder that sometimes, the best treats are the ones you create with what’s already in your pantry, turning simple ingredients into a miniature haunted site.
Why I Love These Ghoulish Little Cups
They evoke childhood Halloween memories, where candy and chaos reigned supreme. Watching kids’ eyes light up when they spot the “graves” is pure joy—like tiny monsters discovering treasure. Each cup has its own charming imperfection—some “headstones” leaning, worms wriggling out—making each one feel alive and authentic. They’re forgiving and adaptable, too; you can swap ingredients based on what you have on hand, and still end up with a spooky masterpiece. Plus, they come together quickly, so even last-minute guests will think you planned a haunted feast.
Ingredient Breakdown: What Makes This Spooky Good?
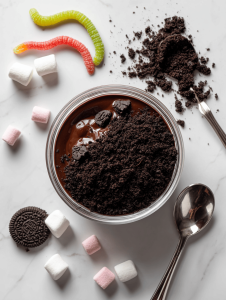
Pudding mix: I prefer instant chocolate for that deep, smoky flavor, but vanilla with a splash of cocoa powder works just as well. It sets firm enough to hold the “tombs,” yet soft enough to be spooky on the tongue.
Cookies: Oreo crumbs or chocolate cookies crushed into dirt are my go-to, but graham crackers can lend a lighter, crunchier feel. Keep some chunks for texture, as that adds to the realism.
Gummy worms: These squishy, jiggly worms bring the scene to life. If you can’t find them, thin strips of licorice cut into little worms work, too. Bright colors add a fun pop of color and make the scene more vibrant.
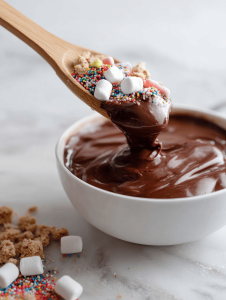
Whipped topping: For a ghostly, cloud-like effect, spoon it generously over the dirt. Heavy cream whipped with sugar is a great homemade alternative, giving you complete control over sweetness and fluffiness.
Decorative stones & tombstones: Use small cookies, candy melts, or shaped rice cereal treats for grave markers. Edible silver dust can add a shimmering, eerie glow, transforming simple shapes into authentic-looking graveyard stones.
How to Bring the Spook to Life: Step-by-Step Guide
Equipment & Tools
– Clear plastic cups—these showcase the layers and add to the spooky aesthetic.
– Measuring spoons and cups—to keep proportions just right.
– Large mixing bowl—used for stirring the pudding and dirt.
– Food processor or resealable bag—perfect for crushing cookies into dirt.
– Small spatula or spoon—for layering and shaping.
Steps
1. Prepare the pudding: Whisk together pudding mix and cold milk according to package instructions—usually about 2 minutes until thickened. As it sets, enjoy that rich cocoa or vanilla aroma filling the kitchen.
2. Make the dirt: Crush cookies into fine crumbs using a food processor or bash them in a sealed bag with a rolling pin. Aim for a crumbly, dirt-like texture that mimics fresh earth.
3. Assemble the layers: Spoon 2-3 tablespoons of pudding into each cup, then sprinkle a layer of cookie crumbs on top. Repeat these layers to add height and depth, ending with a generous sprinkle of dirt on top.
4. Insert the worms: Use tweezers or your fingers to place gummy worms at different depths—some poking out, others buried—creating a crawling, alive scene. Listen for the satisfying crackle as they settle into the pudding.
5. Finish with whipped topping: Generously spoon fluffy whipped cream over the dirt, creating a ghostly cloud effect. Add a final layer of crumbs for that authentic dirt look.
6. Decorate: Place tombstones and stones around the edges—press gently into the whipped topping. Use shaped cookies, candy melts, or rice cereal treats for tombstones, and sprinkle with edible shimmer if desired.
7. Chill: Refrigerate the cups for at least 30 minutes. This step helps all the flavors meld, and the dirt sets firmly, making the cups easy to serve and enjoy.
Checkpoints & How to Know It’s Done
– The pudding should be firm but still creamy—when you insert a spoon, it should hold shape without being stiff.
– Gummy worms should stay in place without floating to the top; if they drift, thicken the pudding slightly.
– The crumb layer should resemble loose dirt—neither soggy nor overly dry.
Mistakes & Fixes That Won’t Turn Your Haunted House Into a Ghost Town
– Forgot to chill? Pop the cups in the fridge for 15 minutes before adding toppings to prevent melting.
– Too many crumbs? Sprinkle lightly and add extra pudding to balance the dirt-to-ghost ratio.
– Over-crushed cookies? Add a splash of milk to restore moisture, then re-crush for the perfect texture.
– Worms floating or sinking? Layer pudding thicker or add a small dollop of whipped topping underneath to stabilize them.
Quick Kitchen Fixes for Spooky Success
– Pudding too runny? Stir in a little more instant pudding mix or chill for 10 minutes.
– Darken the scene: add a few drops of black food coloring into the whipped topping for a more haunted ghost effect.
– Soggy crumbs? Add extra crushed cookies for crunch and texture.
– Tombstones sliding? Use a tiny dollop of frosting or melted chocolate as glue.
– Worms refusing to stay? Secure them with a dab of melted chocolate at their heads.
These pudding cups are more than just a sweet treat—they’re a small act of chaos, a sprinkle of nostalgia, and a reminder that the best part of Halloween is embracing the spooky, silly, and imperfect. Whether you’re serving these at a party or making them just for fun, they’re guaranteed to bring smiles—and squeals of delight—on All Hallows’ Eve.
Remember, the charm lies in the little details—the crooked headstones, the wriggly worms—that turn simple pudding into a memorable Halloween masterpiece. So gather your ingredients, unleash your imagination, and let the spooky festivities begin. Fun, creativity, and a little spooky chaos make these pudding cups a true holiday highlight. Happy haunting and happy eating!
Spooky Halloween Graveyard Pudding Cups
Equipment
- Clear plastic cups
- Measuring spoons and cups
- Large mixing bowl
- Food processor or resealable bag
- Small spatula or spoon
Ingredients
- 1 package instant chocolate pudding mix or vanilla pudding with cocoa powder
- 2 cups cold milk
- 1 cup cookie crumbs Oreo or chocolate cookies, crushed
- 4 gummy worms bright-colored for fun effect
- 1 cup whipped topping store-bought or homemade
- 8 small tombstone cookies or candies shaped cookies, candy melts, or rice cereal treats
- optional edible shimmer dust for a glowing effect
Instructions
- Start by whisking together the pudding mix and cold milk in a large bowl until the mixture thickens and becomes smooth, about 2 minutes. Set aside to firm up slightly.
- Using a food processor or placing cookies in a resealable bag, crush the cookies into fine crumbs that resemble dirt. Aim for a crumbly texture with some chunks for added realism.
- Spoon about 2-3 tablespoons of pudding into each clear cup, creating a nice, even layer at the bottom.
- Sprinkle a layer of cookie crumbs over the pudding, covering it completely to mimic dirt. Repeat the process to build a little height, finishing with a generous sprinkle of crumbs on top.
- Carefully insert gummy worms into the pudding and dirt layers, poking them in at different angles and depths. Some worms should peek out, others buried for a crawling, creepy effect.
- Top each cup with a large dollop of whipped topping, creating a cloud-like, ghostly appearance that covers the dirt and worms partially.
- Decorate the scene by pressing small tombstone cookies or candies into the whipped topping around the edges, and sprinkle edible shimmer dust if using, to give a spooky glow.
- Refrigerate the cups for at least 30 minutes to let everything set and meld together. This step helps keep the scene intact and makes it easier to serve.
- Once chilled, your creepy graveyard pudding cups are ready to serve. Enjoy the playful, spooky scene and creamy, crunchy textures with friends and family!


