
Caramel-making feels like a culinary rite of passage—the kind of adventure that starts with a humble saucepan and ends in glossy, golden squares that melt like silk. I first learned the slow-stirring patience of this process in a Parisian patisserie, where sugar wasn’t rushed, it was revered.
This recipe leans into that tradition, but with a Southern twist—think bourbon vanilla and a whisper of sea salt, reminiscent of Gulf Coast breezes. With a candy thermometer and a bit of attention, you’ll achieve that perfect soft-chew texture that candy shop dreams are made of.
Whether wrapped in wax paper or draped over apple slices, these caramels are a sweet, global-meets-local triumph. So roll up your sleeves—because once you make caramels from scratch, store-bought just won’t cut it.
Why You’ll Be Hooked!

- I first made these on a rainy night in Alabama, and now they’re my cozy go-to whenever I need a little homemade magic—trust me, the texture is unlike anything store-bought.
- Stirring the sugar as it darkens feels meditative, and I’ve learned to time it perfectly for that buttery snap-meets-chew finish—no candy thermometer? You’ll still be okay.
- I’ve added flaky Himalayan salt, used cardamom once (inspired by a trip to Delhi), and even stirred in espresso—this recipe loves experimentation.
- They’ve been my edible gift for birthdays, care packages, and those random days when someone just needs a treat—and yes, I’ve used them to top ice cream.
- Bonus: Making your own sweets kept me off processed ones—unexpectedly helped me curb my sugar intake overall. And they taste really, really good.
Homemade Caramels Recipe
Equipment
- 9×13-inch baking pan
- Parchment paper
- Large heavy-bottomed pot (preferably stainless steel)
- Wooden spoon or silicone spatula
- Candy thermometer
Ingredients
- 2 cups white corn syrup
- 1 tsp Kosher salt
- 2 cans of evaporated milk
- 2 sticks of butter
- 4 cups sugar
Instructions
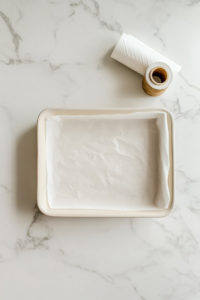
- Start by lining a 9×13-inch pan with parchment paper and setting it aside.
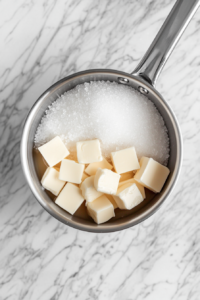
- In a large, heavy-bottomed pot over medium heat, melt together the sugar, butter, corn syrup, and salt, stirring occasionally.
- Once the mixture begins to boil, slowly add the evaporated milk in small increments over 10 to 15 minutes per can, making sure to stir constantly.

- After all the milk is incorporated, continue cooking and use a candy thermometer to monitor the temperature, bringing it to exactly 238°F–240°F.
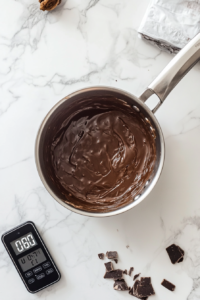
- Avoid going any higher, as it will make the caramels too firm.
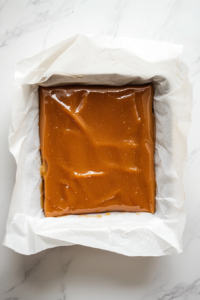
- As soon as the caramel reaches the right temperature, immediately pour it into the prepared pan and let it cool completely.
- Once cool, chill in the freezer for 20–30 minutes or refrigerate for a few hours to make cutting easier.
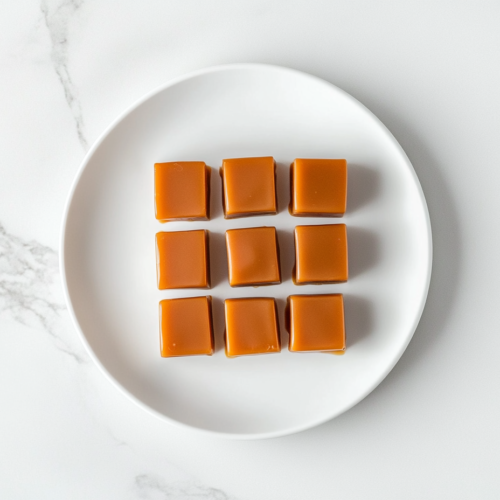
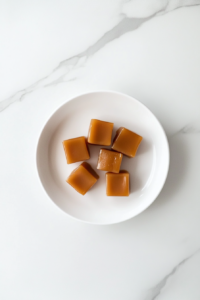
- Slice and enjoy.
Notes
- Stirring constantly while adding milk helps prevent scorching and ensures a smooth texture.
- Using a stainless steel pot distributes heat evenly and reduces the risk of burning.
| Calories | 69kcal |
| Carbohydrates | 17g |
| Cholesterol | 1g |
Variations To Help You Customize This Dish!
- Salted Caramel – Sprinkle flaky sea salt over the surface just after pouring the caramel into the pan for an elegant sweet-salty flavor contrast.
- Chocolate Swirl Caramels – Drop small dollops of melted dark or milk chocolate onto the caramel right after pouring it into the pan, then use a toothpick to swirl.
- Nutty Caramels – Stir in chopped toasted pecans, walnuts, or almonds just before pouring the mixture into the pan for added crunch and flavor.
- Spiced Caramels – Add ½ teaspoon of ground cinnamon or a pinch of cayenne or pumpkin pie spice while cooking for a warm or spicy twist.
- Vanilla Bean Caramels – Stir in 1 teaspoon of vanilla extract or scrape in the seeds of one vanilla bean after removing the caramel from the heat for a deeper flavor.


