This keto lemon garlic chicken is one of those dependable recipes I make when I want something fresh, filling, and full of flavor without spending the entire evening in the kitchen.
I remember first cooking this on a weekday when I needed a simple protein dish that didn’t feel heavy or overly rich. The smell of garlic gently sizzling in olive oil and the bright citrus aroma from freshly squeezed lemon made the kitchen feel instantly inviting.
I often pair this chicken with a light salad or sautéed vegetables, and it always feels like a balanced, satisfying meal that comes together with very little effort.
Behind the Recipe
This dish was inspired by my love for clean, bold flavors that don’t rely on complicated sauces. Lemon and garlic create a classic combination that keeps chicken interesting while still feeling wholesome and approachable.
Why You’ll Love This Recipe
- Fresh Bright Flavor: Lemon adds a lively citrus note that keeps the dish light.
- Juicy Texture: Proper searing locks in moisture for tender chicken.
- Low-Carb Friendly: Perfect for keto or protein-focused meals.
- Quick Cooking Time: Ready in about 25 minutes.
- Simple Pantry Ingredients: Uses everyday staples.
- Versatile Serving Options: Pairs well with salads, vegetables, or keto sides.
- Glossy Sauce Finish: Lemon-garlic reduction coats the chicken beautifully.
- Meal Prep Friendly: Keeps well for future meals.
Chef’s Pro Tips for Perfect Results
- Use Thin Cutlets: Ensures even and quicker cooking.
- Pat Chicken Dry: Helps achieve a proper golden crust.
- Don’t Move Too Soon: Let the chicken sear before flipping.
- Rest Before Saucing: Keeps juices locked inside the meat.
- Add Lemon After Searing: Prevents bitterness and preserves freshness.
Kitchen Tools You’ll Need
- Large skillet
- Tongs
- Sharp knife
- Juicer or reamer
Ingredients in This Recipe
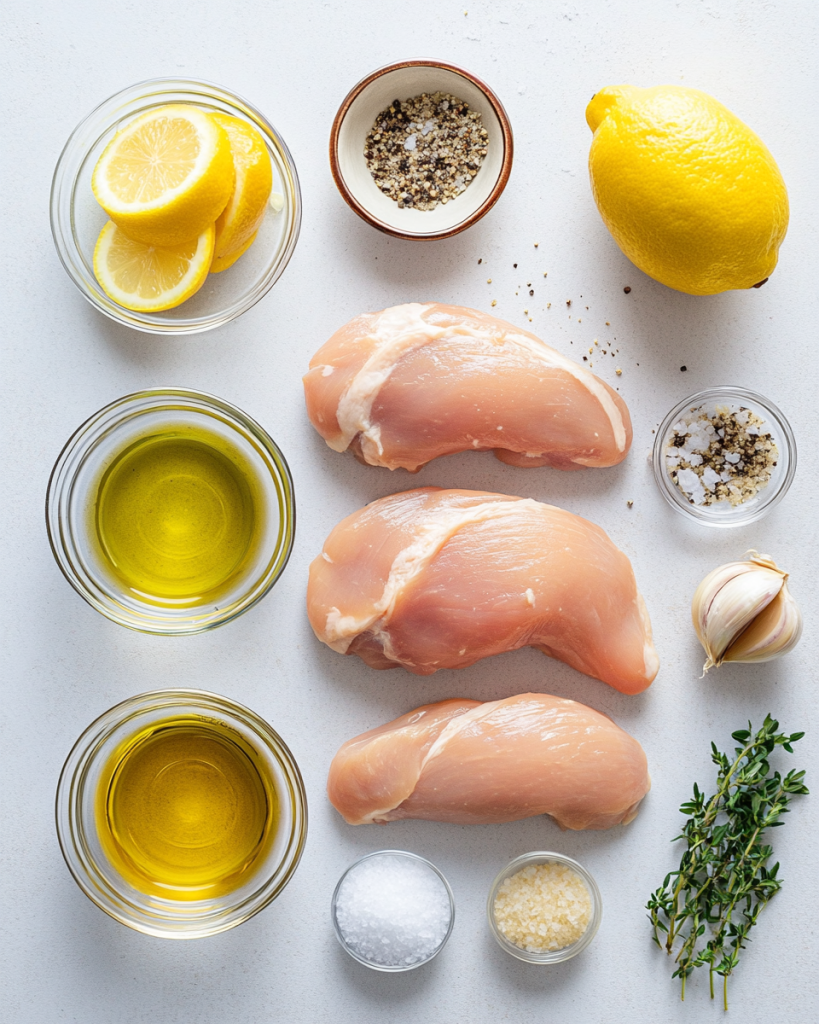
- 4 pieces chicken breasts, skinless and boneless preferably thin cutlets for quicker cooking
- 2 tablespoons olive oil extra virgin preferred for flavor
- 1 clove garlic fresh, minced
- 1 lemon lemon zest and juice
- 2 tablespoons lemon juice freshly squeezed
- 2 tablespoons fresh parsley or thyme chopped for garnish
- to taste salt & pepper season generously
Ingredient Substitutions
- Chicken Breasts → Chicken Thigh Fillets: Offers slightly richer taste.
- Olive Oil → Avocado Oil: Suitable for higher heat cooking.
- Parsley → Basil or Cilantro: Provides a different herbal finish.
- Lemon → Lime: Creates a sharper citrus variation.
Ingredient Spotlight
- Lemon: Adds acidity that tenderizes meat and brightens overall flavor.
- Garlic: Enhances savory depth and complements citrus notes beautifully.
Instructions for Making This Recipe
- Pat the chicken breasts dry with paper towels, then season generously with salt and pepper on both sides. Set aside.
- Heat the olive oil in a large skillet over medium heat until shimmering and just starting to smoke slightly.
- Add the chicken breasts to the pan, laying them flat. Cook for about 6-8 minutes per side, until they develop a golden-brown crust and are cooked through. Use tongs to flip carefully and avoid tearing the meat.
- While the chicken is cooking, zest one lemon directly over the pan for a burst of citrus aroma, then juice the lemon and set aside about 2 tablespoons of the juice.
- Once the chicken is golden and cooked through (internal temperature of 75°C/165°F), transfer it to a plate and let it rest for about 5 minutes to keep it juicy.
- In the same skillet, add the minced garlic and sauté over medium heat until fragrant and golden, about 30 seconds. Be careful not to let it burn.
- Pour in the freshly squeezed lemon juice, scraping up any browned bits from the bottom of the pan. Let it simmer for about a minute until slightly reduced and fragrant.
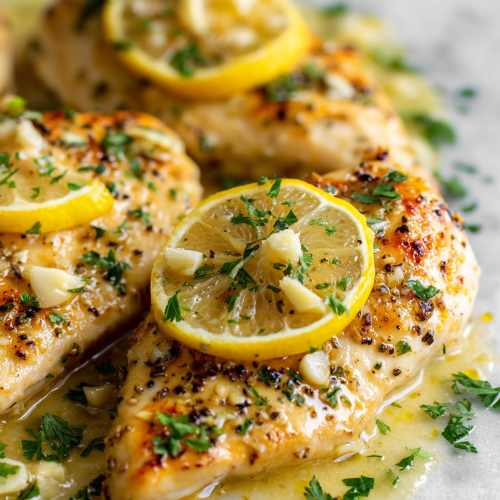
- Return the rested chicken to the pan, spooning the lemon-garlic sauce over the top. Warm through for 1-2 minutes, ensuring the chicken is coated with the bright, glossy sauce.
- Garnish with chopped parsley or thyme, then serve immediately, spooning extra sauce over the chicken for maximum flavor and visual appeal.
Keto Lemon Garlic Chicken
Equipment
- Large skillet
- Tongs
- Sharp knife
- Juicer or reamer
Ingredients
- 4 pieces chicken breasts, skinless and boneless preferably thin cutlets for quicker cooking
- 2 tablespoons olive oil extra virgin preferred for flavor
- 1 clove garlic fresh, minced
- 1 lemon lemon zest and juice
- 2 tablespoons lemon juice freshly squeezed
- 2 tablespoons fresh parsley or thyme chopped for garnish
- to taste salt & pepper season generously
Instructions
- Pat the chicken breasts dry with paper towels, then season generously with salt and pepper on both sides. Set aside.
- Heat the olive oil in a large skillet over medium heat until shimmering and just starting to smoke slightly.
- Add the chicken breasts to the pan, laying them flat. Cook for about 6-8 minutes per side, until they develop a golden-brown crust and are cooked through. Use tongs to flip carefully and avoid tearing the meat.
- While the chicken is cooking, zest one lemon directly over the pan for a burst of citrus aroma, then juice the lemon and set aside about 2 tablespoons of the juice.
- Once the chicken is golden and cooked through (internal temperature of 75°C/165°F), transfer it to a plate and let it rest for about 5 minutes to keep it juicy.
- In the same skillet, add the minced garlic and sauté over medium heat until fragrant and golden, about 30 seconds. Be careful not to let it burn.
- Pour in the freshly squeezed lemon juice, scraping up any browned bits from the bottom of the pan. Let it simmer for about a minute until slightly reduced and fragrant.
- Return the rested chicken to the pan, spooning the lemon-garlic sauce over the top. Warm through for 1-2 minutes, ensuring the chicken is coated with the bright, glossy sauce.
- Garnish with chopped parsley or thyme, then serve immediately, spooning extra sauce over the chicken for maximum flavor and visual appeal.
Texture & Flavor Secrets
- Golden Sear: Creates a slight crust that adds depth.
- Quick Sauce Reduction: Intensifies lemon and garlic notes.
- Resting Period: Keeps chicken moist and tender.
Cooking Tips & Tricks
- Use Even-Sized Pieces: Promotes consistent cooking.
- Control Heat Carefully: Prevents garlic from burning.
- Taste Sauce Before Serving: Adjust acidity or seasoning.
What to Avoid
- Overcooking Chicken: Leads to dryness.
- Adding Lemon Too Early: Can interfere with browning.
- Crowding the Pan: Prevents proper searing.
Nutrition Facts (Approximate per serving)
| Nutrient | Amount per Serving |
|---|---|
| Calories | 320 |
| Carbohydrates | 3g |
| Protein | 35g |
| Fat | 18g |
| Fiber | 0g |
| Net Carbs | 3g |
Preparation Time
- Prep Time: 10 minutes
- Cook Time: 15 minutes
- Total Time: 25 minutes
Make-Ahead and Storage Tips
- Store cooked chicken in an airtight container for up to 3 days.
- Reheat gently in a skillet with a splash of broth or water.
- Slice before storing for easier meal prep portions.
How to Serve This Dish
- Pair with sautéed greens or roasted vegetables.
- Serve over cauliflower rice for a keto-friendly plate.
- Add a fresh cucumber salad for contrast.
Creative Leftover Transformations
- Slice and add to lettuce wraps.
- Toss into a light lemon chicken salad.
- Use as a protein topping for keto grain bowls.
Additional Tips
- Finish with extra lemon zest for aroma.
- Add chili flakes for mild heat variation.
- Use a cast-iron skillet for deeper browning.
Make It a Showstopper
Arrange the chicken breasts on a wide platter and spoon the glossy lemon-garlic sauce generously over each piece. Scatter freshly chopped herbs and thin lemon slices around the dish to create a bright, elegant presentation that feels restaurant-worthy without extra effort.
Variations to Try
- Add capers for a briny Mediterranean twist.
- Include spinach in the pan for added greens.
- Finish with grated parmesan for extra richness.
- Add crushed red pepper for gentle spice.
- Swap herbs with rosemary for a deeper aroma.
FAQ’s
- What sides pair best: Roasted vegetables or fresh salads complement it well.
- Can I use chicken thighs instead: Yes, they stay juicy and flavorful.
- How do I know the chicken is cooked: Internal temperature should reach 75°C.
- Can I bake instead of pan sear: Yes, bake until golden and cooked through.
- Why rest the chicken before saucing: Helps retain natural juices.
- Is bottled lemon juice okay: Fresh juice provides better flavor.
- Can I meal prep this dish: Yes, it reheats well for quick meals.
- What herbs work best: Parsley, thyme, or basil are great options.
- How do I thicken the sauce naturally: Let it reduce slightly longer.
- Can I make it dairy-free: This recipe is naturally dairy-free.


