Some meals instantly make the kitchen feel lively, and this herb-crusted chicken is one of them. I usually make it on evenings when I want something hearty yet still fresh and full of flavor.
The scent of chopped basil and garlic warming in the pan always feels comforting in a simple, everyday way. What I love most is how the crisp, herby coating contrasts with the juicy chicken inside — it feels satisfying without being overly heavy.
I often serve this dish when I want a reliable main that pairs easily with roasted vegetables or a light salad.
Behind the Recipe
This recipe came together while I was experimenting with almond flour as a lighter coating alternative. I wanted a crust that felt flavorful and crisp without relying on traditional breadcrumbs, and fresh herbs turned out to be the perfect solution.
Why You’ll Love This Recipe
- Crispy Herby Coating: Almond flour and herbs create a golden crust.
- Juicy Tender Chicken: Oven finishing keeps the interior moist.
- Low-Carb Friendly: Ideal for keto or balanced meal plans.
- Fresh Aromatic Flavor: Basil and parsley provide a vibrant taste.
- Simple Pantry Ingredients: Easy to prepare without complicated steps.
- Balanced Texture: Crunchy exterior with soft, juicy meat inside.
- Great for Meal Prep: Stores well for later lunches or dinners.
- Versatile Serving Options: Complements vegetables, salads, or light sides.
Chef’s Pro Tips for Perfect Results
- Dry Chicken Before Coating: Helps the herb crust stick better.
- Press the Coating Firmly: Ensures an even golden layer during searing.
- Sear on Medium-High Heat: Builds flavor and texture quickly.
- Finish in the Oven: Prevents burning the crust while cooking through.
- Rest Before Slicing: Keeps juices inside the chicken.
Kitchen Tools You’ll Need
- Baking dish
- Shallow bowl
- Non-stick skillet
- Tongs
- Meat thermometer
Ingredients in This Recipe
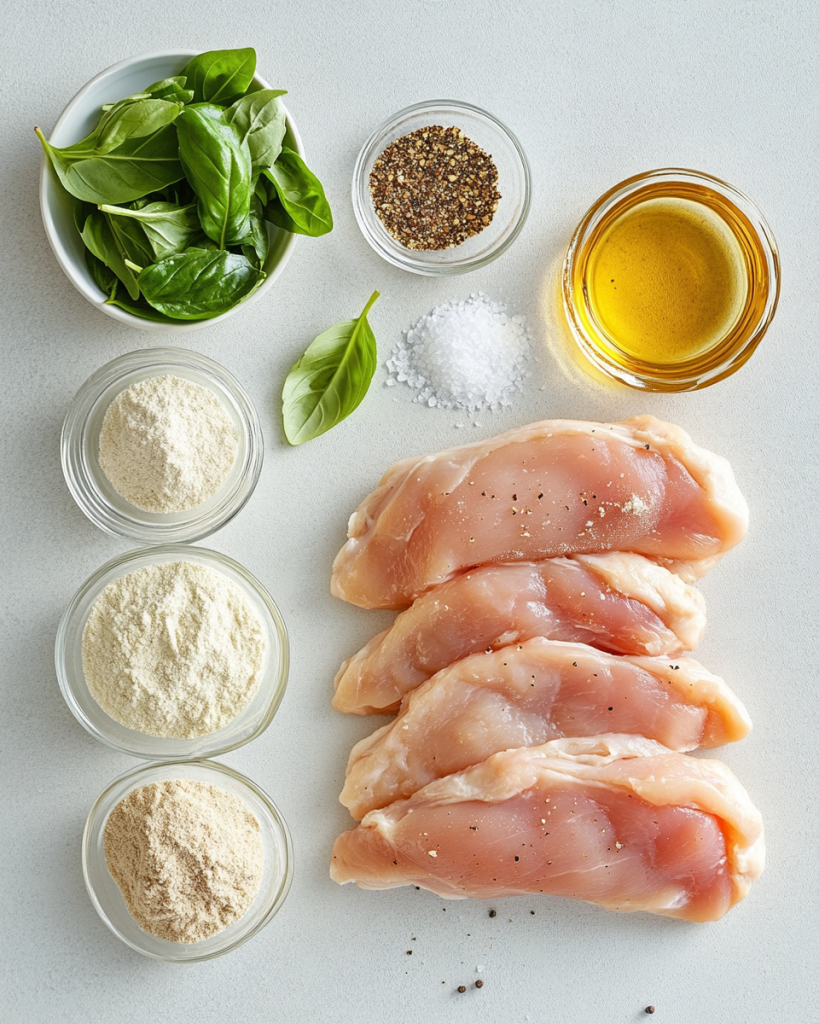
- 4 pieces chicken breasts boneless and skinless
- 1/2 cup fresh basil, chopped
- 1 tsp dried parsley
- 1 tsp garlic powder
- 3/4 cup almond flour
- 1 tbsp olive oil extra virgin recommended
- to taste salt and pepper
Ingredient Substitutions
- Almond Flour → Crushed Pork Rinds: Offers a crisp keto-friendly crust.
- Basil → Oregano or Thyme: Adds a deeper herbal profile.
- Garlic Powder → Onion Powder: Creates softer savory notes.
- Olive Oil → Avocado Oil: Suitable for higher heat cooking.
Ingredient Spotlight
- Almond Flour: A popular low-carb coating that crisps beautifully when seared.
- Fresh Basil: Known for its bright aroma that lifts savory dishes.
Instructions for Making This Recipe
- Pat the chicken breasts dry with paper towels to remove excess moisture, then season lightly with salt and pepper.
- In a shallow bowl, combine the chopped basil, dried parsley, garlic powder, and almond flour, mixing well to create your herby crust mixture.
- Press each chicken breast into the herb mixture, ensuring it adheres evenly and forms a thick, fragrant coating.
- Heat a tablespoon of olive oil in a non-stick skillet over medium-high heat until shimmering and slightly fragrant, about 1 minute.
- Carefully place the coated chicken breasts into the hot skillet, listening for a lively sizzle that indicates proper sear temperature.
- Sear each side for about 2-3 minutes, until the crust turns golden brown and fragrant, flipping gently with tongs to keep the coating intact.
- Transfer the skillet to a preheated oven set at 200°C (390°F) and roast the chicken for 15-20 minutes, or until the internal temperature reaches 75°C (165°F).
- Once cooked, remove the skillet from the oven and let the chicken rest for 5 minutes to allow the juices to redistribute and the crust to firm up.
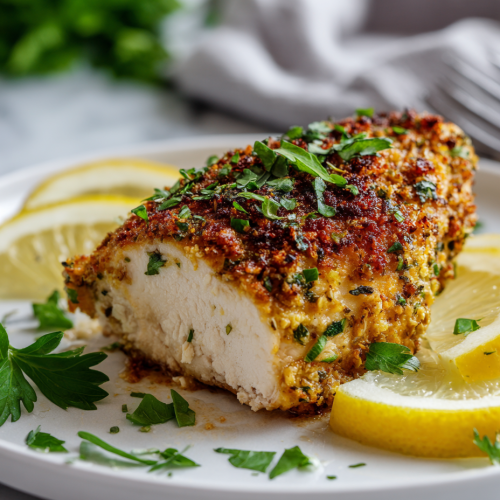
- Slice into the chicken or serve whole, garnished with a sprig of fresh herbs if desired, and enjoy the fragrant, crispy crust with tender, juicy meat.
Herb-Crusted Chicken
Equipment
- Baking dish
- Shallow bowl
- Non-stick skillet
- Tongs
- Meat thermometer
Ingredients
- 4 pieces chicken breasts boneless and skinless
- 1/2 cup fresh basil, chopped
- 1 tsp dried parsley
- 1 tsp garlic powder
- 3/4 cup almond flour
- 1 tbsp olive oil extra virgin recommended
- to taste salt and pepper
Instructions
- Pat the chicken breasts dry with paper towels to remove excess moisture, then season lightly with salt and pepper.
- In a shallow bowl, combine the chopped basil, dried parsley, garlic powder, and almond flour, mixing well to create your herby crust mixture.
- Press each chicken breast into the herb mixture, ensuring it adheres evenly and forms a thick, fragrant coating.
- Heat a tablespoon of olive oil in a non-stick skillet over medium-high heat until shimmering and slightly fragrant, about 1 minute.
- Carefully place the coated chicken breasts into the hot skillet, listening for a lively sizzle that indicates proper sear temperature.
- Sear each side for about 2-3 minutes, until the crust turns golden brown and fragrant, flipping gently with tongs to keep the coating intact.
- Transfer the skillet to a preheated oven set at 200°C (390°F) and roast the chicken for 15-20 minutes, or until the internal temperature reaches 75°C (165°F).
- Once cooked, remove the skillet from the oven and let the chicken rest for 5 minutes to allow the juices to redistribute and the crust to firm up.
- Slice into the chicken or serve whole, garnished with a sprig of fresh herbs if desired, and enjoy the fragrant, crispy crust with tender, juicy meat.
Texture & Flavor Secrets
- Nut-Based Crust: Almond flour creates a crisp yet tender bite.
- Fresh Herb Infusion: Basil releases aroma during searing.
- Dual Cooking Method: Skillet sear plus oven roast ensures even texture.
Cooking Tips & Tricks
- Use Even Thickness Breasts: Promotes consistent cooking.
- Avoid Excess Oil: Too much can soften the crust.
- Taste Seasoning Early: Adjust herbs or salt before coating.
What to Avoid
- Skipping Oven Step: May leave chicken undercooked inside.
- Overcrowding the Skillet: Reduces crispness of coating.
- High Heat Roasting: Can burn herbs before meat cooks.
Nutrition Facts (Approximate per serving)
| Nutrient | Amount per Serving |
|---|---|
| Calories | 350 |
| Carbohydrates | 6g |
| Protein | 38g |
| Fat | 18g |
| Fiber | 2g |
| Net Carbs | 4g |
Preparation Time
- Prep Time: 10 minutes
- Cook Time: 25 minutes
- Total Time: 35 minutes
Make-Ahead and Storage Tips
- Store cooked chicken in an airtight container for up to 3 days.
- Reheat in an oven or skillet to maintain crisp coating.
- Slice before storing for easy meal prep portions.
How to Serve This Dish
- Pair with roasted zucchini or asparagus.
- Serve alongside cauliflower mash for a keto plate.
- Add a fresh green salad for balance.
Creative Leftover Transformations
- Slice into wraps using lettuce leaves.
- Chop into a protein-packed salad bowl.
- Add to a low-carb grain substitute dish.
Additional Tips
- Finish with lemon zest for extra brightness.
- Add chili flakes for mild heat variation.
- Garnish with fresh herb sprigs for visual appeal.
Make It a Showstopper
Arrange the herb-crusted chicken on a large wooden serving board and scatter a few fresh basil leaves around the pieces. A light drizzle of olive oil and a sprinkle of coarse salt enhance the rustic, inviting presentation while highlighting the golden crust.
Variations to Try
- Add grated parmesan to the crust for extra richness.
- Include smoked paprika for subtle warmth.
- Use rosemary for a deeper aromatic profile.
- Add crushed almonds for extra crunch.
- Finish with a light lemon butter drizzle.
FAQ’s
- Can I use chicken thighs instead: Yes, adjust cooking time slightly.
- How do I keep the crust crispy: Sear well and avoid excess moisture.
- Can I bake only without searing: Yes, but searing improves flavor.
- Is almond flour necessary: It provides texture but can be substituted.
- What herbs work best: Basil, thyme, oregano, or parsley.
- How do I check doneness: Internal temperature should reach 75°C.
- Can I meal prep this recipe: Yes, it reheats well for later meals.
- Is this gluten-free: Yes, almond flour keeps it naturally gluten-free.
- What sides pair best: Light roasted vegetables or salads.
- Can I air fry this chicken: Yes, for a slightly lighter texture.


