It’s week 3 of the hack challenge! And I must admit, it was a close call this week to get a project done.
But, ta da, here it is!
![]()
I wasn’t quite sure how I was going to get any project finished for this week’s post done while we are out of town … I had a back up plan in mind, but I’m glad I didn’t have to use it because I wasn’t terribly thrilled about. Fortunately, my sister in law up here in New England was having a craft night at her house this week, and I realized it would be the perfect opportunity to work on a hack challenge project! First, though, a trip to the local thrift store was in order. I’ve been asked how I come up with these project ideas – well, basically I go to a thrift store or hardware store or somewhere else that has interesting items I might be able to upcycle … and I hunt there until that “aha!” moment. This time, I was at the thrift store and spotted this:
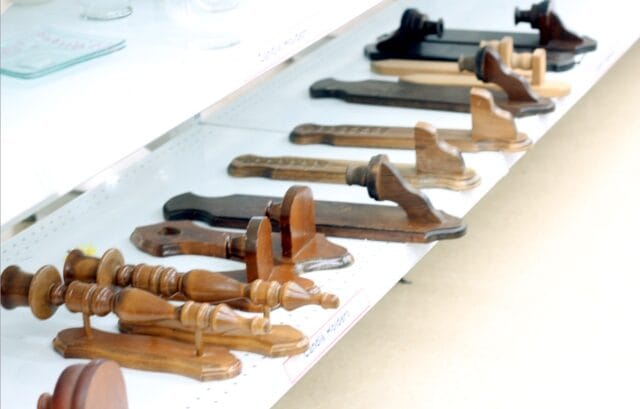
A row full of old wooden wall mount candle holders. Tip: when in doubt, pick something up, turn it upside down and figure out what to do with it then. 😉
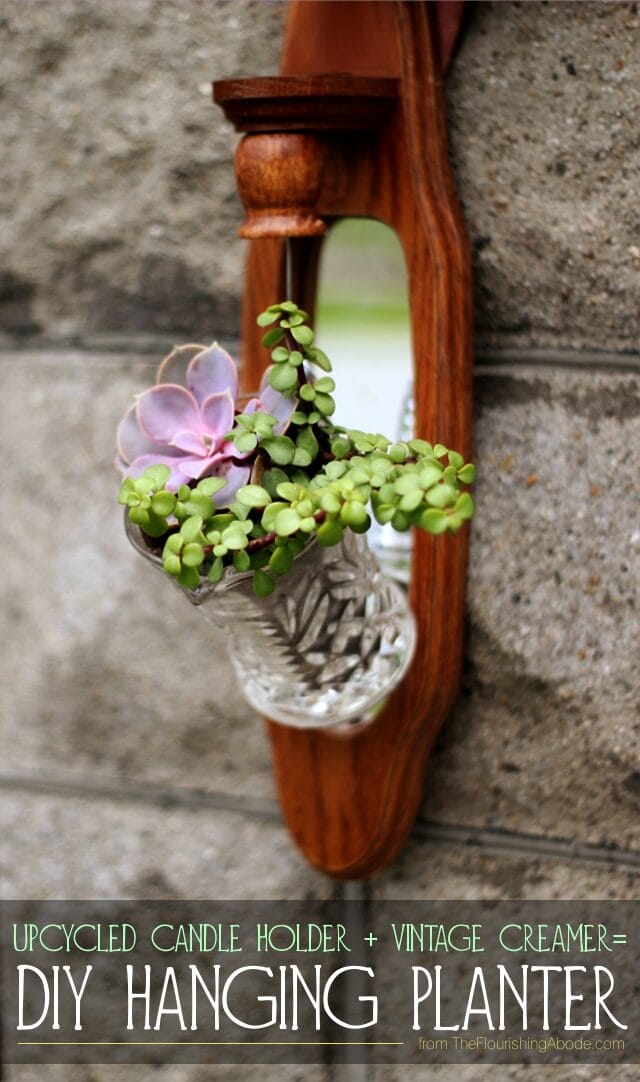
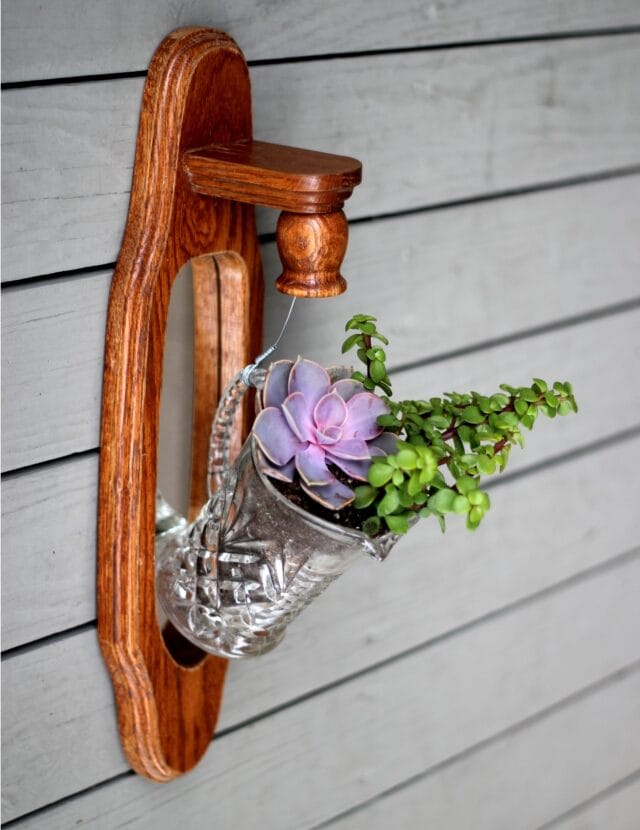
This week’s project turns one of these candle holders upside down and suspends a little creamer pitcher from it to create a unique small hanging planter. Aha! 🙂
For this project you will need: 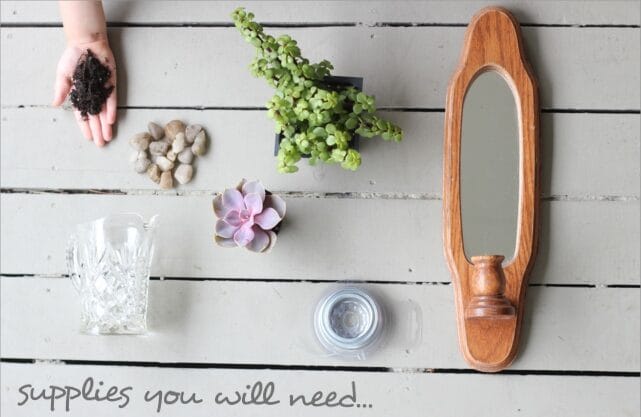
Supplies:
– A wall mount candle holder. Make sure it is one that has the actual candle holder part secured on with a screw. (Most are like that, so it’s not hard to find.) I chose one with a mirror, but it certainly doesn’t have to have a mirror. Just pick one you like.
– A small creamer pitcher. Or small jar, etc., as long as it has a handle. Try to find one that has a handle which is weighted toward the top. In other words, if you just hang it on your finger by the handle, it should still be facing mostly upward, not completely sideways or upside down. If the handle is toward the bottom of the creamer, it will face downward, and would spill the contents if hanging. You want one with a handle toward the top so the contents will stay inside when it is hanging.
– Wire. I used about an 19 gauge wire. You definitely want it to be sturdy, because of the weight it will be supporting – but it also needs to be pliable for tight wrapping.
– Pebbles. This is for drainage in the bottom of your planter.
– Plants. Just whatever you like! I think something that trails some would be pretty due to the way the pitcher will look like it is almost pouring out the plant. Like ivy, or a trailing succulent, etc. Nothing large, this is a small planter.
– Soil. Whatever type of soil is appropriate for the plants you chose.
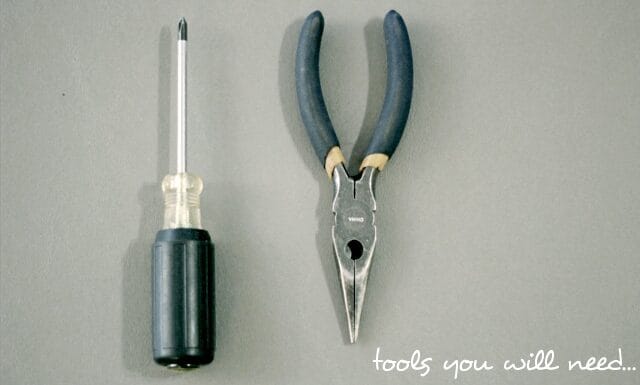
Tools you will need:
– A screwdriver. It will need to fit the screw that secures the candle holder.
– Wire pliers/wire cutter. For the wire. Um, yeah, pretty straightforward. 🙂
And now that you have everything you need, here’s how to make it!
UPCYCLED HANGING PLANTER TUTORIAL:
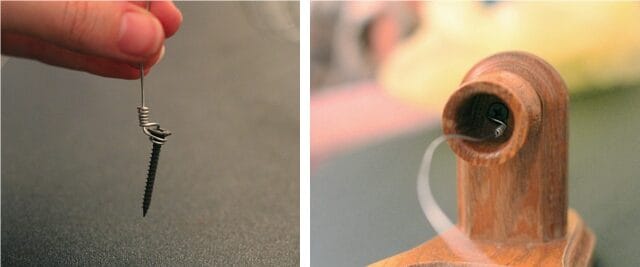
Step 1: In the bottom of the little cup that holds the candle, there should be a screw. Unscrew it completely.
Step 2: Since you will be hanging the entire finished project upside down from the original orientation of the candle holder, remove the hanging bracket on the back of the candle holder, and attach it to the other end, so it can hang the direction you want.
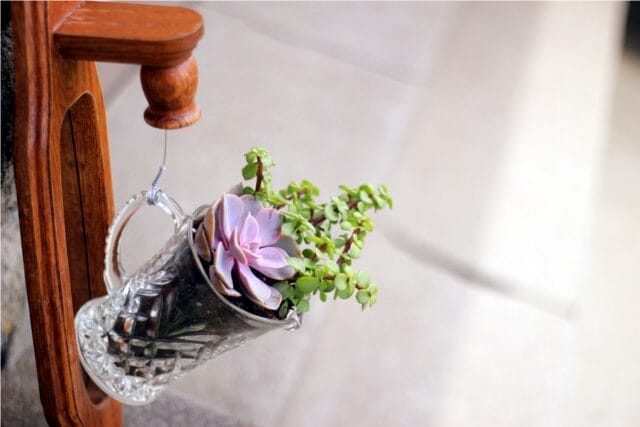
Step 2: (Photographed below) Using the wire pliers, tightly wrap around the screw (the one that had attached the candle holder) a couple times between the head of the screw and where the threading begins. The end of the wire should not be in these tight loops. There should be several inches of wire coming out from one end of the loops, and the rest of the wire should continue out from the loops. Bend both continuing segments upward so they go up over the head of the screw. Tightly spiral wrap the shorter end of the wire around the other wire. If after several tight wraps you still have too much wire, cut the extra length off of the SHORT wire. Reattach the candle holder, and securely screw back in the wire wrapped screw.
Step 3: (Photographed below) Loop the wire that now extends downward from the candle holder a few times tightly around the handle of the creamer. Then, in the same manner as on the screw, use the wire pliers just above the creamer’s handle to very tightly wrap the continuing wire back around the wire the hangs down from the candle holder. Don’t skimp on the number of loops, and don’t let them be loose. This is what is securing the wire from unraveling and dropping the creamer, so make sure your wire wrapping is nice and tight!

Step 4: Place a layer of small pebbles in the bottom of the creamer for water drainage. Add soil, make holes for your plant(s), loose the plant’s roots and place the plant in the planter. Place more soil on top of the roots, and gently water your plants according to their needs.
Step 5: Hang your new upcycled planter on the wall and enjoy!
A couple additional ideas that people who saw me working on this project mentioned: – If you wanted, you could paint the wooden candle holder before attaching the creamer.
– To make it a little artsy, in addition to the structural wire wrapping, you could do some free form wire wrapping around the entire creamer.
I hope you enjoyed this week’s diy home decor project!
If you did, you might also be interested a previous planter project I made out of old light fixture globes, or in the other hack challenge posts.
I’m curious – if you were going to paint the candle holder, what color would you paint it? Leave a comment below, I love to hear from you!
![]()
Posted in Challenge, gardening, hack a week, home decor, upcycling, vintage
Hello all!
Still blogging from New England at this time, we will be here through the end of the week, Lord willing. We have really been enjoying the time here, and today we are out exploring Boston, Tim is job hunting, and I am apartment hunting and so forth. 🙂
So far on Wednesdays we’ve been doing the “Seek the things above” series, and within the next couple of weeks I want to start taking that in a little bit of a new direction. There are several different topics related to the Bible that I would like to delve into here on my blog, and I’ve been trying to figure out which to go with first. For instance, maybe do a series on a specific book of the Bible, or on the overall theme and “story” (using the word story here not to mean that it was a story in the sense it was untrue, but a story in the sense that that it is one continuing set of events that all tie together, not just a hodge-podge of various happenings), or how study to the Bible, or a number of other things. And while I do want to get into those at some point in the future, there has been some interest expressed in a topic that seems like the most natural place to start:
Can we know if there is truth? Is there a God?
And if so, how do we know who he is?
I am really looking forward to this! I think it is a fascinating study, and important to consider, whether you already believe or whether you do not. For those who do believe, while, yes, we are called to have faith, we are not called to have a blind faith – God has told us to “seek”, as in Matthew 7:7 – there is evidence to look at, and on which to base our faith. So I hope to be starting that new series soon on Wednesdays, but I didn’t feel that while we were travelling and on the road was the best time to begin, so I’ll look forward to that beginning that very soon, Lord willing.
For today, though, as we are enjoying time with family and seeing so many amazing things and spending time as a family, I just want to share the following verse of thankfulness:

What are you thankful for today?
Also, I’d be curious to know which of the topics I mentioned might be something you would be interested in – and also if there is another topic you’d be interested in discussing here. As always, I love to hear from you, whether in the comments below or by email!
![]()
Posted in bible, printables, seek the things above

Greetings from the land of Dunkin Donuts, crazy traffic, lobsters and rocky beaches – we’re in New England!
I simply love road trips. And this one is especially exciting for a couple reasons – first of all, we are getting to see both my family in Pennsylvania, and my husband’s family in Rhode Island, as well as many other friends along the way! But the other exciting thing is that this trip is hopefully the prelude to a more permanent type of road trip: moving!
We are hoping and praying to be able to move to Boston soon. This week we are here for my husband to work on his job hunting – he is looking for a new chemical engineering job in the Boston area. I am sooooo excited!!
I love going to a new area, and I am especially enthusiastic about Boston. While I was growing up, we moved around a lot, living in the north, the south, even Europe for a couple of years. Since Tim and I have been married, we’ve only lived in the south – first in Tennessee and currently in Kentucky. And both were lovely, but we’re also ready to be moving back up north.
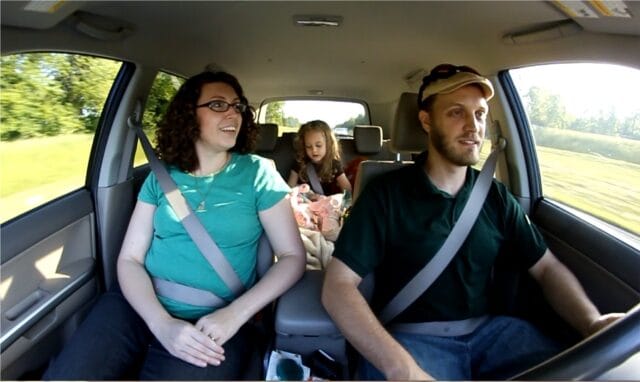
The trip itself has been a lot of fun – being in the car together for hours gives lots of opportunities for talking as a family, singing loudly, playing car games and just enjoying being together. I always loved road trips when I was a kid, and it is fun now to enjoy it with my own family.
We’ve even been making some road trip videos on this trip, some of which might become vlogs here. Beware that there might be some general goofiness. 🙂
Here is something that we might do a road trip vlog about – and I’d love to incorporate some of your thoughts or comments you might have into our video:
What are your favorite road trip activities and games?
Let us know and you might get a shout out in an upcoming vlog! 🙂
Leave your thoughts and comments below, I love to hear from you!
![]()
Posted in exploring, family, travel
![]()
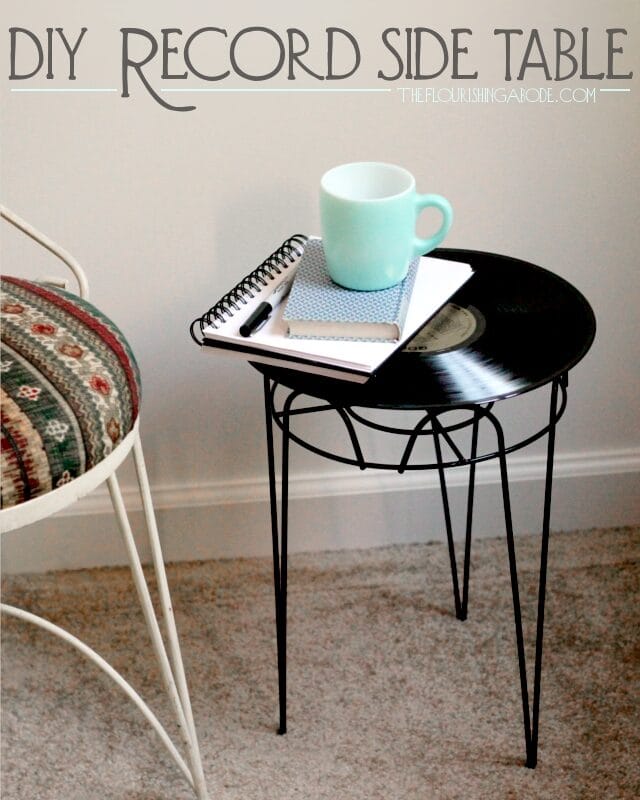
Onward with the weekly hack challenge – where each week I have to hack an item and upcycle it into something completely new, typically decor related. I’m so tickled with how last week’s project of the DIY solar paper lamps went, and I’m also excited about this week’s project: an upcycled DIY record side table!
I’ll be honest – I had a completely different idea for this week originally, but I was having trouble at the hardware store finding screws with the right threading, the right head and the right length that I needed for that other project .. I must admit, I never thought I’d have such specific requests out of a screw, but it was what I needed. The guy at the hardware store was baffled by my request. Soooo, long story short, I’ll need to take a different approach with that project, and I put it off for a different week. And instead I came up with and idea that is MUCH simpler … ridiculously easy, in fact. Which I’m guessing would be preferable to me sending you on a project that calls for you to baffle the hardware store with your request for a certain kind of screw! So here we go with the simple (but still kinda spiffy, in my opinion, anyway) project for this week…
For this project you will need:
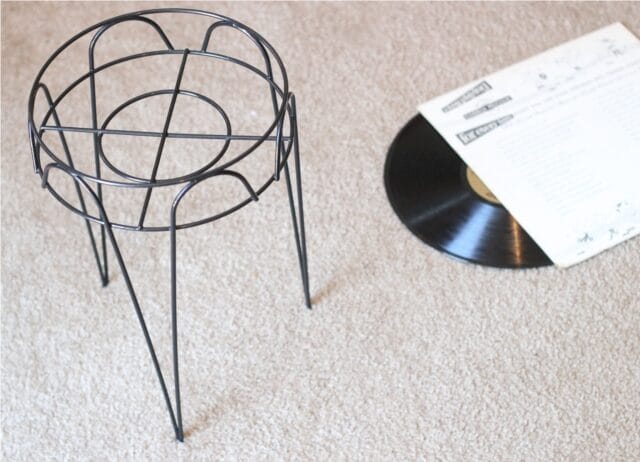
‣ ‣ ‣ a vinyl lp record. Make sure it is one that you don’t mind “destroying”, for all listening purposes, anyway. You can often pick up some old records at thrift stores for about a dollar.
‣ ‣ ‣ a planter stand. Preferably in black, to match the record. Also, make sure it in not wider at the top than your record’s width. For instance, for a 12 inch record, I used a planter stand that was 10 inches wide at the top.
‣ ‣ ‣ a glue gun.
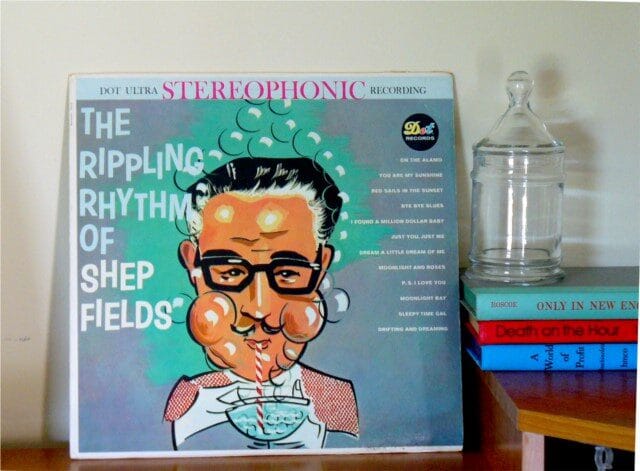
You’ll only need the record, not the cover. But if it has interesting cover art, you don’t have to toss it! I think vintage albums make an interesting decor feature! Like this:
But back to the table! Instructions:
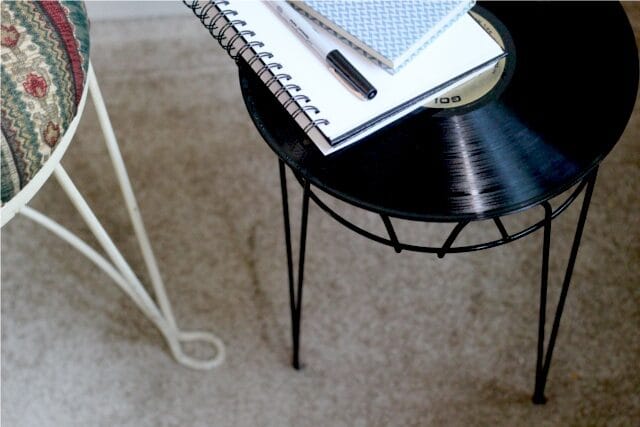
1. Wipe down the record with a damp paper towel – chances are if it’s vintage, there may be a good bit of dust trapped in the grooves. Clean both sides, then wipe gently with a dry cloth. Make sure it’s dry before attaching to the table.
2. Heat up your hot glue gun.
3. Once the hot glue gun is ready to use, apply an even line of hot glue all along the entire top edge of the planter, where the record will sit.
4. Promptly place the record on top of the planter while the glue is still hot. Be careful to place it so that it is centered – you don’t want to scoot it around to get it in the right position after it has come in contact with the glue.
(I tend to eyeball things, but if you’re not comfortable with eyeballing it, before you heat up your glue gun, subtract the width of the top of planter from the width of the record, then divide that in half, and the result will be the amount of overhang the record should have. (ie, 12 inch record – 10 inch planter = 2 inches. Divided in half makes it 1 inch of overhang all around.) On the underside of the record, measure that far in from the edge in a couple of spots, and mark at that point. Then, when placing the record on the planter, watch from underneath as you place it, and line up your markings so they land directly on the glue, and your record will be centered.)
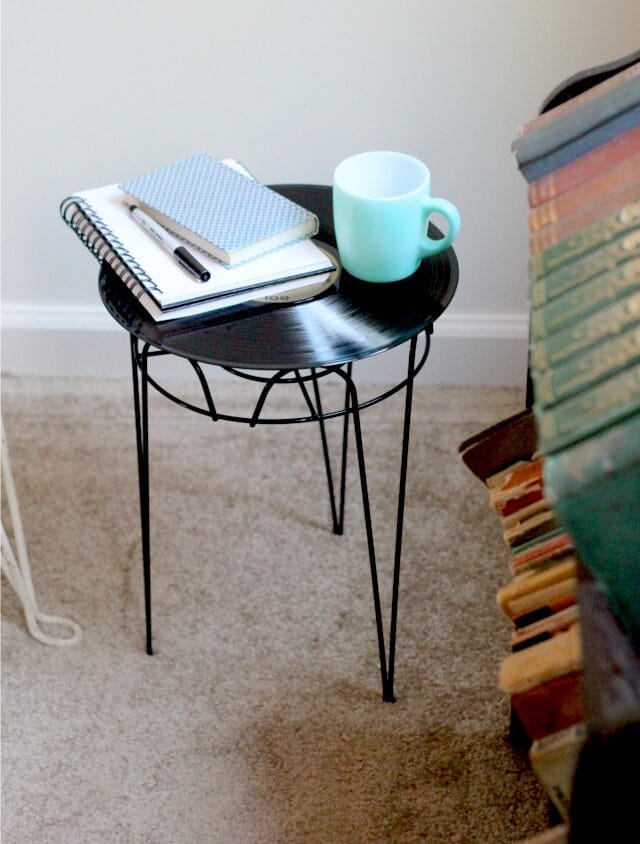
5. Let the glue cool and harden – and you are done! Super easy.
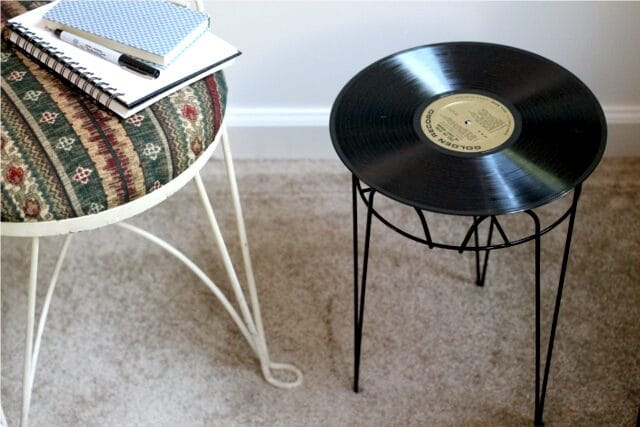
All that is left to be done is to find the perfect spot for your new little little piece of upcycled furniture to sit! 🙂
Hope you enjoyed this project idea! Records are great for projects, there are tons of things you can make with old records. Have you ever upcycled a record? And I’m curious – do you prefer easy projects like this, or more time intensive/elaborate projects?
Leave your thoughts and comments below, I love to hear from you! 🙂
![]()
Posted in Challenge, hack a week, home decor, style, upcycling, vintage
Continuing the “Seek the things above” (Colossians 3:1) series, today, let’s think about this question:
What does it mean to be faithful to God?
Let’s think about it this way … what if your spouse said to you, “Hey, honey, I love you so much. And I want you to know I will always be faithful to you on Tuesdays and Fridays.”
I think it’s a pretty safe bet to say that’s not going to cut it!
No, being faithful isn’t an on-and-off switch. It is a part of life, it is a part of who you are. It’s not something to be labelled a couple times a year, or just on Sundays, and then to be neglected the rest of the time. That is not faithful.
In marriage, we are to be faithful to our spouse by always and continually keeping the vows we made to them. In our relationship with God, we are to be faithful to him by keeping the commitment we made to him the day we were baptised: “We were buried therefore with him by baptism into death, in order that, just as Christ was raised from the dead by the glory of the Father, we too might walk in newness of life.” (Romans 6:4) Walking in newness of life. What does that mean? Well, the Bible is it’s own best commentary! The text in Romans 6 goes on to explain what this new life is:
“We know that our old self was crucified with him in order that the body of sin might be brought to nothing, so that we would no longer be enslaved to sin. For one who has died has been set free from sin. Now if we have died with Christ, we believe that we will also live with him. We know that Christ, being raised from the dead, will never die again; death no longer has dominion over him. For the death he died he died to sin, once for all, but the life he lives he lives to God. So you also must consider yourselves dead to sin and alive to God in Christ Jesus. Let not sin therefore reign in your mortal body, to make you obey its passions. Do not present your members to sin as instruments for unrighteousness, but present yourselves to God as those who have been brought from death to life, and your members to God as instruments for righteousness.” (Romans 6:6-13)
To summarize in a word: obedience.
And if, on that final day, we want to hear from him, “Well done, good and faithful servant” (Matthew 25:21), then we need to BE that good and faithful servant now, obeying what he has told us. Not only on Sundays, but everyday. And what a comfort that we can “know therefore that the LORD your God is God, the faithful God who keeps covenant and steadfast love with those who love him and keep his commandments” (Deuteronomy 7:9) But our faithfulness to God will never be as perfect as God’s faithfulness to us- and even if we suddenly WERE always perfectly faithful from this point on, there is nothing we could do to remove our past sins. Just as it goes on to talk about in the next couple verses of Romans 6 – we are under grace: “For sin will have no dominion over you, since you are not under law but under grace. What then? Are we to sin because we are not under law but under grace? By no means!” (Romans 6:14-15)
God calls us to be faithful, and we must – but it is by his grace we are saved.
I hope you’ve found this encouraging. As always, if you disagree, or if you have questions, or just want to talk more, my goal is always to simply convey accurately what the Bible says and I am more than happy to discuss in greater detail – whether in the comments below, or if you’d rather talk more privately, you can always email me. I love to hear from you!
Leave your thoughts below, or drop me a note! 🙂
![]()
Posted in bible, seek the things above
Since yesterday was Mother’s Day, I wanted to share with you a little stop motion video that my 4 year old daughter and I made together for my mom – we also made another version for my husband’s mother. My little girl did the drawings and I told her the basic idea of what to draw, and then took the photos. You’ll notice a little segment, though, where she stops and “thinks about obeying God” … that part was my 4 year old’s idea that she wanted to include, which I thought was pretty sweet – and it shows the kind of example that both my mother and my mother in law set, that my four year old automatically associates them with the desire to obey God. I am so blessed to have both of these wonderful women in my life. Happy Mother’s Day to both of them. 🙂 I hope you’ll enjoy our little stop motion video!
Did you have a nice Mother’s Day? (whether you’re a mother yourself, or celebrating your own mother)
Leave your thoughts and comments below!
Posted in family, stop motion, video
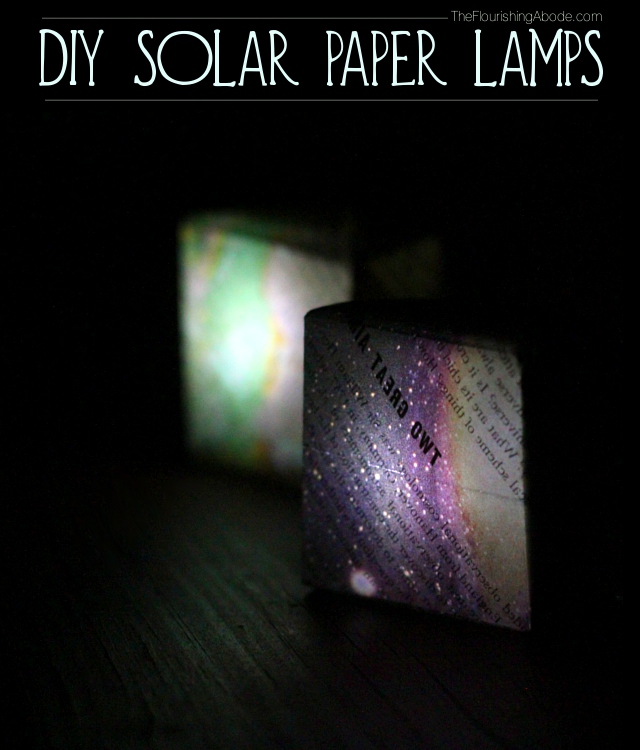
Here we go! Thanks to all of you who voted for what would be the next challenge – and this week it begins: The “Hack” Challenge, where each week we come up with a new DIY project, upcycling an item from it’s original purpose into something new, usually some kind of home decor or furniture type project. And so onto week 1… Solar Powered DIY Paper Lamps!
![]()
Generally when I come up with an idea for something I would like to turn into a lamp or use in lighting, I run into the same problem: it is not an object that would be safe to light with an interior candle, and it can not be easily wired. But for this week’s project, you don’t have to worry about either one. Since these are solar powered, they don’t need any wiring, and there is no flame to worry about. We’re “hacking” into yard solar lamps to create our own glowing paper lamps. I think these would be lovely in a collection as part of a centerpiece for a dinner table, or lining a deck railing for an evening gathering, or anywhere ambient lighting would be a nice touch! All you need are… – some solar powered lawn lights, one for each lamp. You can pick these up for just a couple dollars. – an old illustrated book (encyclopedias are perfect because of the variety of types of images!)
– and a pair of scissors
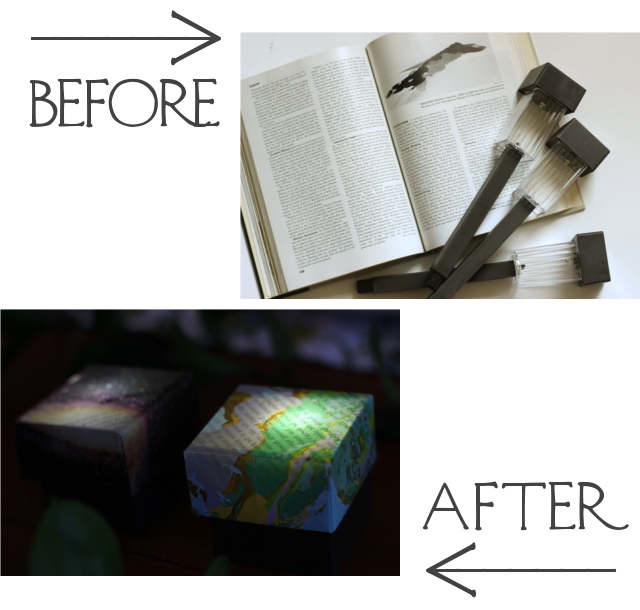
Make sure you get the type of solar lawn light that has a square head, and then stand them outside in direct sunlight to get their charge.
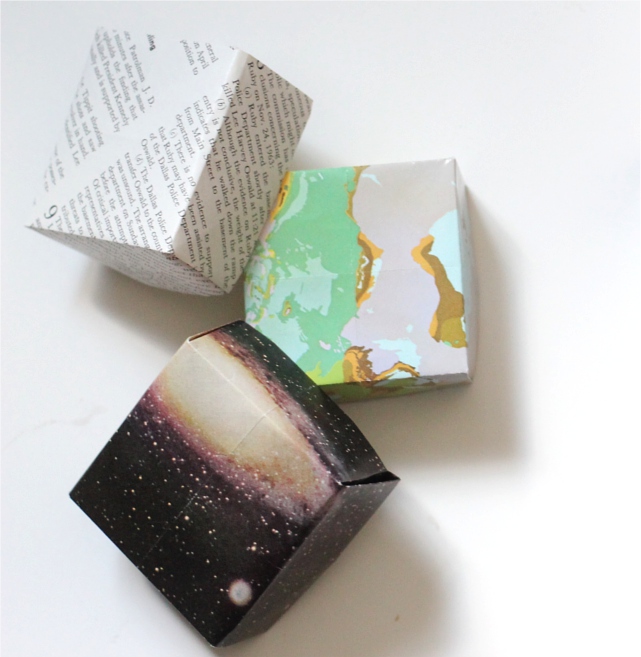
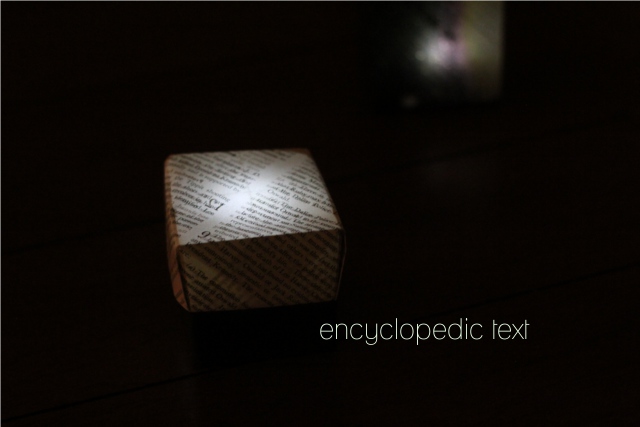
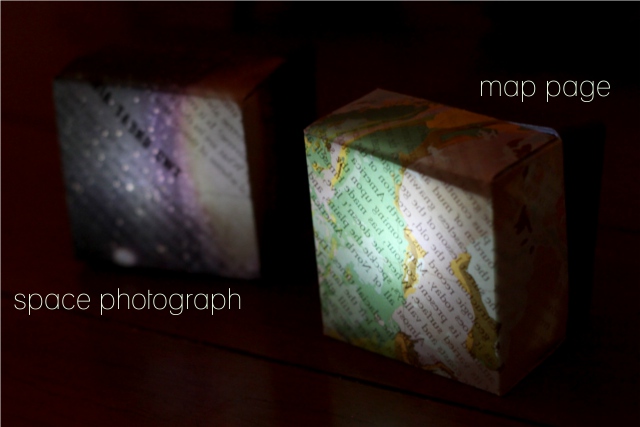
Choose an page from the encyclopedia, or whatever paper you choose to use, that has a design you want to be the “shade” of the lamp, bearing in mind that whatever is on the back of the page will also shine through. Cut a square out of that page. The size ratio that I used was this: for a 2.2 inch square solar lamp head, I used a 5.5 inch square paper. Here is how you turn that piece of paper into an origami box to use as the “shade” for your mini-lamp:

I made three separate paper “shades” for the lamps, all from the same encyclopedic volume from 1965: one was an outer space photograph, one was a map, and one was simply text.
Once the solar lights have charged, bring them inside, and disconnect the top, which contains the light bulb, from the rest of the body. You’ll probably be able to do this by simply partially twisting the top and then lifting.
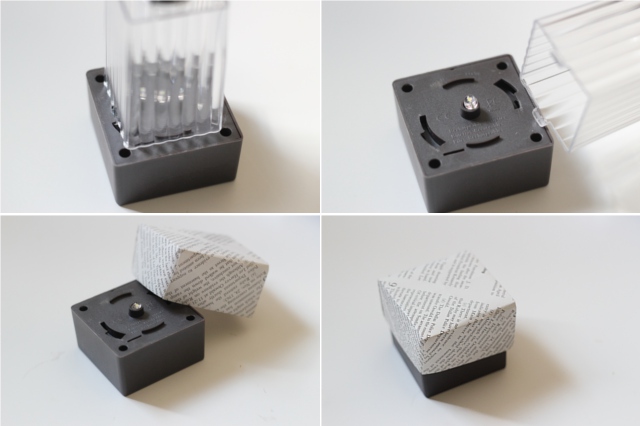
Fit the paper box shade onto the solar light unit. If there is still a fair amount of light where you will be displaying these, you’ll probably need to sit them face up, so that the solar panel is downward, and not absorbing any light, so that the light will turn on, as shown in the first photo below. But if it will be dark, I think they also look very nice displayed on their side, as shown in the second photo below. Either way, you now have a unique piece of ambient lighting, which can be changed to a completely different design by simply making a new origami box to go on top!
Remember to recharge the lights before their next use – just remove and set aside the paper, and reattach the light to the top of the yard light, and put it back outside!
So, what do you think of week one of the hack challenge? What type of paper would you use on top of your lamps?
Leave your thoughts and comments below, I love to hear from you! 🙂
![]()
Posted in Challenge, hack a week, home decor, upcycling, vintage
I recently saw a little cartoon where it shows a woman in the morning, thinking to herself, “I’m going to get so much done today!” Next block, she had been punched in the face by a figure saying, “Nope.” That figure was labelled “Internet”.
There is a sad and growing trend of people’s online lives beginning to eclipse their real lives. We read of social media addiction and people frustrated that their offline life is not as full as it is online. That is NOT what I want. I see my online presence as a way to chronicle and supplement my real life – not replace it!
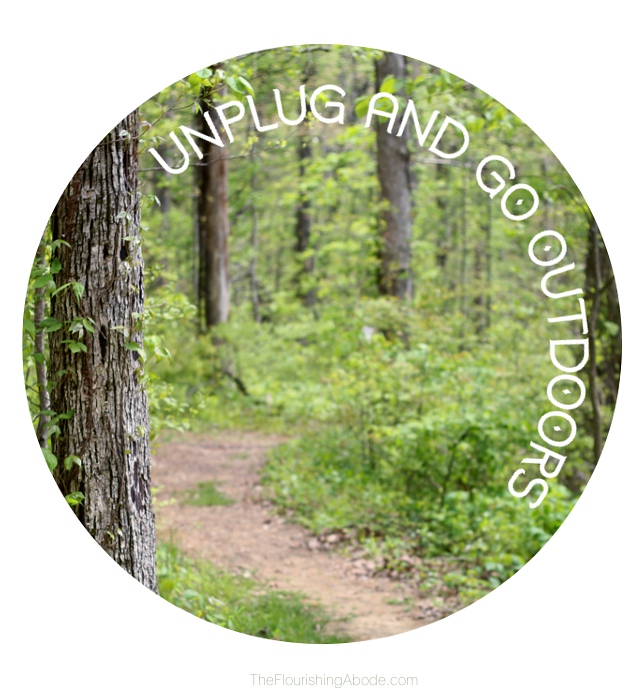
I know there are always tons of things vying for your attention online. But for the next week and a half, my blog will not be one of them. I just finished up the Adventure-a-Week challenge last Friday, which was SO much fun, and the weekly “hack”/upcycling challenge isn’t starting until May 11th – so in this brief period in between I’m taking a step back, and a short break from the blog. I’d encourage you, too, if you find that the Internet is taking up more time than you would like, to disconnect and spend more time in the real world! Go hiking, read to your kids, cook a meal, have some friends over – all that beautiful real-world-real-life living.
Think of it this way- which are you more likely to regret: Spending less time online?
Or spending less time in your real life?
So unplug and go outdoors! And then when coming back online, to supplement and not replace real life, you’ll have so much more inspiration and things to share. I’m personally looking forward to a little break – and I’ll look forward to seeing you back here on The Flourishing Abode for the new challenge starting on May 11th, Lord willing – and I intend to have a much cleaner real life Abode by that time. Spring outdoors (and spring cleaning) here I come!
Until May 11th, signing out,
-April
![]()
Posted in blogging, family, motivational
Well, it’s time for the final post of the Adventure-a-Week Challenge! It’s been such a fun project over the last several weeks. You can see a list of all the Adventure-a-Week posts here.
(If you’re reading this in an email or reader and can’t see the video above, just click here .. the video is where the substance of this week’s challenge is! Plus there’s some new stop motion video, as well as the announcement for what the next challenge will be, now that the adventure challenge is over!)
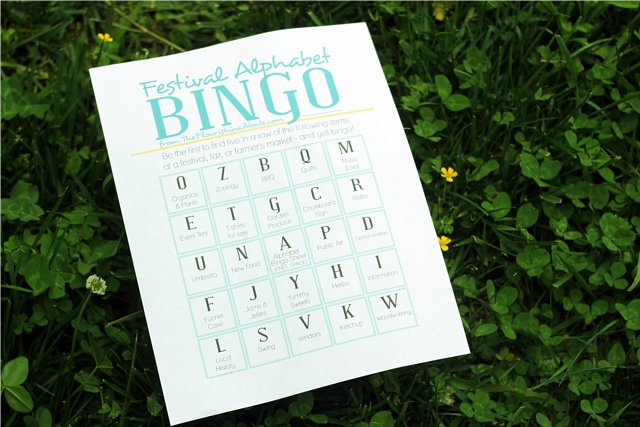
Below, is the set of Bingo printables – I’ve created 6 Bingo sheets, all from our same festival alphabet finds, but scrambled into a different order for each sheet. Hand one out to each family member and start looking for the finds! Just like any Bingo – who ever crosses off five in a row first, yells “Bingo!” and wins. 🙂 All of the items just need to be spotted/found, not necessarily purchased. Most of the letters should be self-explanatory as shown in the video … but on “N”, new food just means anything you have never tried before. In my case, it was a deep fried Snickers. Om nom nom!
Just click the image below to access the free Festival Alphabet Bingo printables:
Thanks to Mike Mills (from the Knox Historical Museum who was giving free local history tours at the festival) and B Edward Pope (from bpopewoodturning who gave us lots of interesting information about his work) for both kindly letting me take your photos for our project! And thanks to Kevin MacLeod for the music.
Don’t forget about the upcoming new challenge as announced at the end of the video, and be sure to subscribe so you’ll be the first to know when the new challenge posts begin! 🙂 So what do you always look for at fairs and festivals?
Leave your thoughts and comments below, we love to hear from you!
![]()
Posted in Adventure a Week, Challenge, family, printables, stop motion, video, vlogging
For this week’s “Seek the things above” post, I want to pose some questions which I hope will be thought provoking.

Why do you believe what you believe? Is it because it is what you’ve always heard? What your culture commonly believes? What your parents taught you? What your preacher, priest or pastor told you? How do you know what they told you is true? Does the Bible tell us we’ll just get a feeling about it – or does the Bible teach us to study his Word to know his will?
What about the Bereans? When the apostle Paul went to Berea and started teaching in the synagogue, it says that they “were more noble than those in Thessalonica; they received the word with all eagerness, examining the Scriptures daily to see if these things were so. Many of them therefore believed” (Acts 17:11-12 ESV)
Do we follow this example? Are we noble like them? Do we examine the scriptures daily to see if the things that are taught to us are so?
Are the people who teach us today infallible? Or is it possible to be taught error? Do we compare the things we are taught to the things God has said? Did God make his Word available to all? Do you have a Bible?
How often do you study it?
Leave your thoughts and comments below.
![]()
Posted in bible, printables, seek the things above


