If coding and customizing your WordPress theme sounds too scary – then this post is for you!
(This is part 4 of my DIY Blog Redesign series… a little more techy for this post, and next week we’ll be back on the artistic.)
Admission: I designed my blog look – and starting out, I knew next to nothing of how to do CSS. Now, granted, I did know a fair amount of HTML, but I still had to start from scratch on CSS – and it wasn’t too bad. My point is this … don’t be intimidated by coding and the “back stage” parts of blog design. It doesn’t have to be scary. Especially if you’re using a child-theme. But I don’t claim to be a coding expert by any means.
Today’s post is going to be all about:
-choosing a “theme” for your blog (this is something you install from WordPress, related to templates)
-creating a child-theme (this doesn’t mean it’ll look like a kid blog, it just means you’re creating your own sub-theme based on the original)
-the CSS (style sheet)
-simple approach to coding

Ok, so the first step is finding a theme. If you remember the blog design tips from last week, we’re looking for a theme that allows those to be put into use. Plenty of white space, nothing too distracting, nothing that will detract from your content. I remember when I first signed up with WordPress, I was initially distraught because there wasn’t a theme that had exactly everything I was looking for … but that was before I realized just how much you could really customize a theme once you had set it up.
The theme I recommend going with is “Thematic”. It’s free, which is obviously really nice. It’s a simple and well-thought-out design, specifically made to be customized to however you want to design it. The really nice thing about Thematic is that even if you just leave it without customization, it is a nice simple theme … but that by putting in some work on it, the possibilities are endless. For instance, my blog is based on Thematic, as will Lori’s blog which I am redesigning as we go through this series … but our blogs will look entirely different in the end. Also (and this is a huge bonus) there is a whole community of Thematic support – Q&A forums, a free guide, etc. If you want more info on Thematic, as well as links to the support options, you can find that here.
To use the original Thematic, just go to your WordPress admin panel, then go to Appearance –> Themes, then click the “Install Themes” tab and search new themes for “Thematic”. Click “install”. After it’s installed, make sure you click “activate” to, well, activate it. ;) Simple, eh?
This is what Thematic looks like in just the base form:
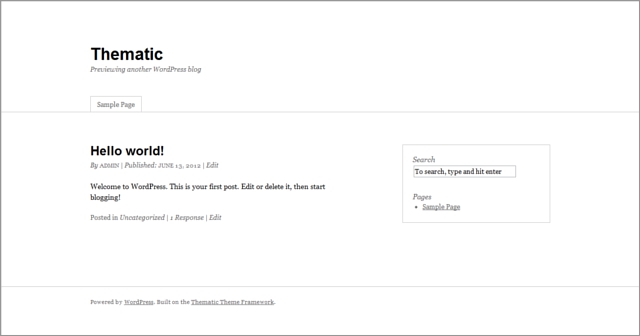
Pretty simple, pretty basic. But as we’ve talked about before, often less is more. Content “pops” well on a simple design. However, we’d obviously like to add interest, branding and a more developed aesthetic. So first you’ve installed the original Thematic, and now we’re going to make “child theme”. This is basically a second-generation version of a theme. Pretty much all you’re doing is copying the basic elements of the theme, but setting it up as it’s own theme where you can customize it. You can click here for an easy run through on setting up your Thematic child theme.
So, I’ve now set up a child theme based on Thematic for Lori’s blog. Here’s what her site looks like, and as you’ll see, the child theme automatically looks just like Thematic:
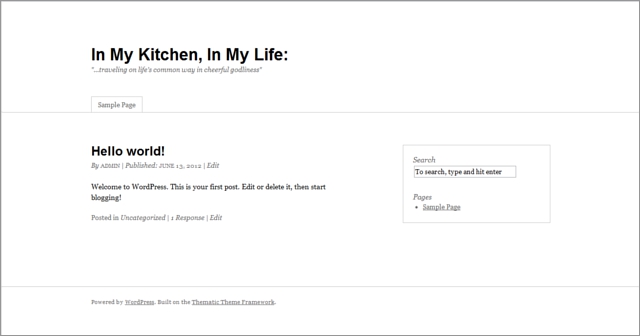
But now that it’s a child theme was can go in and start tinkering around.
*taps finger tips together menacingly*
(Ok, well, not menacingly. This isn’t supposed to be scary.)
*taps finger tips together expectantly*

This is where we get into … the stylesheet! Ta da! It’s a CSS file that has all the rules for what your site looks like as a whole. I’m trying to think of a good analogy for the stylesheet … maybe think of it as your design’s DNA. It has all the guidelines for how your site displays. Some of the changes we’ll be making will be more like dying your hair or getting a tattoo – things that affect just one particular area – but appearances we want to change overall on your blog, we’ll have to rewrite the “DNA”, the stylesheet.
As I mentioned, I knew next to nothing about CSS when I started out. However, there are a ton of great resources online … CSS Basics being a good place to start. You don’t have to know how to do everything, but at least familiarizing yourself with the basics is a good idea.
You can get to your style sheet by going to your WordPress dashboard, then click “Appearances”, then click “editor”. There might be a few files available over on the right, and you want the one called “style.css”. Since you have a child theme, all the rules come from Thematic by default, but you’re not editing Thematic itself. (Again, make sure you’ve installed AND activated your child theme, you don’t want to start tinkering in the innards of the original Thematic, just your child theme.)
Here is kind of what your stylesheet will look like, starting out:
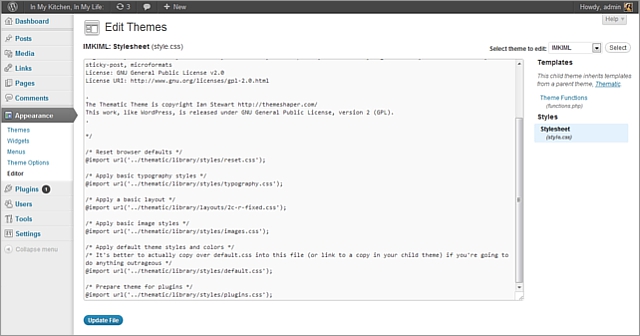
You may not be able to read it in my tiny preview above, but the friendly Thematic author has written handy and helpful notes here touching on what you need to do to change things from the Thematic defaults. It mentions different files … like
“/* Apply default theme styles and colors */
/* It’s better to actually copy over default.css into this file (or link to a copy in your child theme) if you’re going to do anything outrageous */
@import url(‘../thematic/library/styles/default.css’);”.
Basically, its just relying on the original Thematic rules unless you change it … so if you want to change something, but you don’t really want to start coding from scratch, you can copy/paste those files and just edit the lines you want to. Since you previously have installed the original Thematic before installing and activating your child theme, you can find all these files by logging into your hosting service (like we talked about how I use BlueHost), going to your cPanel, then to your File Manager. In your file manager, in the file for your WordPress (for instance, Lori’s file is called “InMyKitchenInMyLife”), open the folder “wp-content”, then the folder “themes”, then the folder “thematic”, then “library”. That contains all the folders that have the various CSS files. Don’t change the content of these files here, just copy the contents of, for instance, the default.css file, and then paste it into your stylesheet. Then you can edit lines. Today’s post is mostly an introduction to the whole topic, and in future posts I’ll share with you specific line edits you may want to do. But just for example today, let’s say we want to change the width of the site. I’ve already copied over the necessary CSS file, and I just go to the line that determines the width of the site, and change the pixel number:

I find it very helpful to know I don’t have to start from scratch and code it all myself – I can tweak! This is my simple approach. And lest panic seize you, let me tell you this – you don’t have to edit anything blindly. If there is something you want to know how to do specifically, you can probably find it online. For instance, next week, I’ll be sharing the code snippet you can insert in there so you can add a banner. But there are lots of tutorials out there if there is something you want to do and you don’t know how. Plus, there are also the Thematic forums where you can search because your question may already be answered there, and if not you can ask for help on a specific question. (But do try to figure it out first, before asking on the forums … they’re super helpful, but they do have guidelines and expectations that you’re trying to figure it out.)
So that’s how/where we’ll be changing DNA stuff. :) There are somethings that can be changed without altering the DNA. For instance, if you go to your WordPress dashboard, then to “Appearances” and then to “Widgets”, you’ll see lots of places to change things up there as well … these are more changes to a specific area. Over on the right, you can see what these different areas are. For instance, if you want to add a search box to your sidebar, you simply drag “search box” over from the widget options and drop it in the sidebar area. And there are lots of other areas you can drop widgets, such as at the end of a post, at the top of a page, etc. You don’t need to (and probably shouldn’t) use them ALL – or you’re going to start overwhelming your blog with extra “stuff”. But it is nice to have the capability to be able to easily drag and drop into any of these areas. We’ll be getting more into the sidebar, and what should go there, in a couple weeks. Next week, though, we’re going to be working on actually creating graphics, and starting to put them on the site. I can’t wait to share Lori’s new banner with you then!!
I hope that this has helped to show that getting in and tinkering doesn’t have to be scary or overwhelming. You just take it one edit at a time. :)
Do you do this kind of thing on your blog? If not, does this help to make it less scary? I hope so!
Leave your thoughts and comments below, I love to hear from you. :)
If you’ve missed the other posts in this series on DIY blog redesign, here they are:
Part 1: Discover your branding with “The Drawing Board” Printable
Part 2: WordPress vs. Blogger
Part 3: Design Tips + Design Worksheet
Part 4: Themes, Coding and Stylesheets (That’s today’s post!)
Part 5: Making your own graphics
Part 6: 7 Blog Layout Tips to Engage your Reader
Part 7: Blog Page: The Must-haves and the Panache
Part 8: 25 WordPress Tips
Part 9: The Big Reveal
Part 10: 7 Ways to Promote and Market Your Blog


oh, April, i never study ccs code or html, and i always regret it, because isn’t so easy to learn by yourself… but your explanation seems so simple, and then there is also the link you share.. want to try them soon!
Yeah, it’s nice that there are some great resources out there to help you learn, like the CSS Basics site! Thanks, Fede :)
Oh my stinking goodness… thank you! I love learning about this stuff. I don’t really know why since sometimes it seriously stresses me out, but in some weird way it’s fun for me.
ANYWAY… thanks so much. I never understood the child theme and I NEVER mess with my original theme. I use Canvas… a paid WooTheme and I LOVE it. It’s so customizable on it’s own, without messing with the stylesheet. I think learning to mess with the CSS and HTML will help me go even further with my site without having to hire too many little things out. I know nothing about CSS and a little about HTML. Thanks for the resource links. I’m definitely taking advantage of those things.
Can’t wait to see where things go from here, and I’m looking forward to learning more about designing next week!
Yeah, I think I know what you mean about it both feeling stressful and fun. Whenever I’m trying to code something and it’s not coming out quite right (like, if it’s showing up differently in another browser), I definitely don’t enjoy that part, haha! But it’s always exciting to figure it out in the end. To just be putting in simple text … and to see things visibly change on my site. Pretty cool. :) So glad you liked the post! :)
Oh man, I tried to learn all of this stuff a few months ago, and my brain just doesn’t think in code! I signed up for Code Academy (which I think is a little different than what you’re talking about) and after like, Lesson 3 I just gave up. It felt like math. :-/
Oh, yeah, I don’t know if I’d enjoy taking actual lessons in it either. I kind of found it easier just to learn some of the basics … and then just whenever I wanted to do something in particular, I would learn that piece of information. I don’t like math either … usually because it felt like I was learning a ton of stuff that I would never actually use. I think I’d probably feel the same way taking lessons in coding. I’d much rather kind of get enough to wrap my brain around the idea, then use a child-theme and just learn how to do specific edits I want to do. Anyway, that’s how I approach it :)
I don’t know anything about CSS but Google seems to be my best friend. Lots of bloggers write useful tutorials on blog design. However, I can do like what they teach but actually sometimes I don’t understand why I had to do that and how. Copy and paste doesn’t really teach me well :(
Yeah, I definitely recommend starting out by learning the basics of CSS so you kind of know what’s going on … like that CSS basics site I linked to in the post. It makes things go a lot easier! However, I think there is also a difference in approach if you’re trying to learn CSS so that you can do things on your own perhaps for multiple sites … vs. you’re learning some CSS so you can know enough to design one blog the way you want it. In the first you would do a LOT more studying/learning, whereas in the second you still have to learn, but not as in depth, and you can “cheat” with some copy/paste. I guess it depends on your goal :)
Another great tutorial! More than a tutorial actually – it comes with a reassuring voice saying “you can do this!” It’s fun, really, once you start to make some changes and see them appear on your site. I too wouldn’t have the patience to sit down and ingest loads of CSS coding info, but it’s amazing what you learn by doing. I’ve learned to use Firebug also, which is really helpful in locating things in my stylesheet.
April,
I have been working on this all afternoon, and I have to say….. I am LOST! I did finally upload a child theme, but I’m not sure I did it 100% correctly. Now I’m not sure where to find the code to copy in… Am I the only one who doesn’t understand how to do this? I really want to do this, but I’m floundering a bit.
I’ll drop you a note. :)
hey there, this is really helpful- thank you! However, the “install theme” button is not showing up in my word press CMS and I was wondering if you downloaded wordpress.org in order to be able to upload and customize the theme? I can’t customize anything on the word press I am using and am stuck choosing between these stupid themes I dont want to use! Arg! Thank you very much!
Hi! Yes, I am using WordPress.org not WordPress.com … the .org version allows for much more customization. Here’s some info on that breakdown … https://www.theflourishingabode.com/2012/07/diy-blog-design-where-to-blog-and-how-to-begin.html
I installed the regular Thematic Theme, but I am havinbg problems setting up the child theme: there directions are abit unclear. Can you lamins terms it ti me step by step please?
TY
Ditto =)
Is there a theme in wordpress.com that is similar to what you are using “Thematic”? I have wordpress.com and would like to work on my blog.
Thanks,
Tralaina
there was no theme called thematic that i could see :?
Hey there,
I just thought I’d let you know that the link to part 5 actually links to part 6!
Hi April,
Can you help me out with the Child Theme? The link is a little unclear and sounds like it may be for more advanced users. What is a directory?
I’m REALLY not getting the child theme. I’ve recruited my techy hubby to help me so we’ll see if we can figure this out between the two of us. If I can figure this out, I can do anything! Well…maybe. Haha!
I created my WordPress site/blog quite a while ago so am a bit rusty at this. I have a new domain I would like to create a site for with a different theme. How do I do this? Do I need to install WordPress again? If not, how do I go about this? Thanks for your help!
I just discovered your blog and I am so happy to find you because u explain everything so clearly.I had also started blogging in WordPress with my own domain name but I am facing many problems as I don’t know anything about coding.The main problem I am facing is that whenever I am trying to customize my theme it is not working properly and whenever I am trying to add new post it is taking so much time to load and I have good broadband connection with speed 1mbps so I don’t understand what is the main problem.Can you please help me out or recommend what should I do.I will be very thankful to you.