Well, we are on to week 4 in the Creative Biz challenge! This week we are going to be looking at a couple of topics that came up a LOT in the post where you all posted your creative biz questions: photography and descriptions. A few things have to be in place before really honing those two, though – you have to have a great product, know who your target market is, and be pricing to actually make a profit. Those points are what we have talked about in previous weeks, so now we’re moving on to product photos and product descriptions.
In both of these two topics remember this: you’re trying to use this medium to convey the essence of your brand in a way that is effective to your target market.

First off, let’s jump into photography. Here are 7 tips (and if you followed my blog design series, you’ll recognize a certain amount of overlap)
1: Excellent lighting makes more of a difference than an excellent camera
Your product photography isn’t going to be printed and hung on walls as art. Its primary purpose will be fulfilled in a relatively small online image. You don’t need a fancy camera with a huge number of megapixels. I took my product photos with an old point and click for a long time. Excellent lighting, though, makes a HUGE difference. Avoid using a flash at all costs. Use natural light – but not direct sunlight. Great places to find diffused natural light are near a window, or outside in the shade.
2: The garnish should not be larger than the food
Props/backgrounds/settings can really set the stage for your photos. But just like a beautiful plate of food, the garnish can help make it more appealing but shouldn’t overwhelm or distract from the main dish. Remember, props and backgrounds should be enhancing the visual appeal of your product, not distracting away from your product.
3: White space is your friend
This doesn’t mean you necessarily have to have a completely white background, but leaving some white or simple areas for the eye to “rest” can help your items really pop – as opposed to everywhere being busy or cluttered. You can also get the same effect by having the product in focus, and the background out of focus.
4: Do your own thing
Your shop photography is an excellent opportunity to convey your own signature branding and shop aesthetic. Don’t just base your photos on someone else’s photos; think about how you can portray your own unique style in your photos. This doesn’t mean you have to reinvent the wheel, though. For instance, there are plenty of shops modelling vintage clothing against a white background, and you can do that too .. but if your model is always wearing a bowler hat, that’s going to be unique and identifiable.
5: Limit your photography choices
It’s a good idea to not have a completely different background/style/setting in each and every setting. For instance, if you’re selling earrings, if one photo is of them hanging on a tea cup, one photo on a chalkboard background, one photo on red fabric, one photo on a model, one photo on sand, one photo on wood, etc., etc. – it’s going to be distracting and make your shop less cohesive. Not every background has to be the same, of course, but if you limit to just a few that convey the same style and use them repeatedly in your shop, it will help to convey your branding and style. This also really helps to keep cohesion when you have different types of products in your shop.
6: You aren’t trying to appeal to everyone
Focus on appealing to your target market with your photography. If your target market is stay-at-home mothers, don’t worry whether urban hip-hop teens are going to love your product photos. If you target market is 20-something guys who are into geekery, don’t worry if your product photos aren’t appealing to 40-something fashionistas. As a small handmade business your goal is appeal to a niche market, not to appeal to absolutely everyone.
7: Your photography should always reflect your branding statement
I recommend having a “branding statement” – a short phrase the encapsulates the style and message you want to convey through your shop. I made a free printable to help develop a branding statement – it was originally meant for blog branding, but much of it applies to shops as well: www.theflourishingabode.com/2012/07/diy-blog-design.html All aspects of your shop should convey your branding – your listings, your photos, your packaging, etc. I find this is easiest when you can actually state your branding in a single statement.
Now let’s talk a little about descriptions…

Writing descriptions can be a challenge, because there are a few different goals you want to accomplish with a description and they don’t necessarily always want to play nicely together. Such as…
– appealing to your target market
– including all the necessary details to compensate for the fact the viewer can’t examine it in person
– using keywords to boost your SEO
– conveying the unique value of your product
– communicating that you have other related items if this one if not quite what the viewer is wanting
– being succinct and easy to read
Online attention span is generally fairly short. Because there is so much information to convey in your description, I used to write reeeeeeeally long wordy paragraphs in mine. But when someone scrolled down from the photo to find huge chunks of text, it actually had the opposite effect of what I was wanting: if it felt like too much to read, the easiest response was to just leave the page.
I have since found the best friend of description writing: bulleted lists.
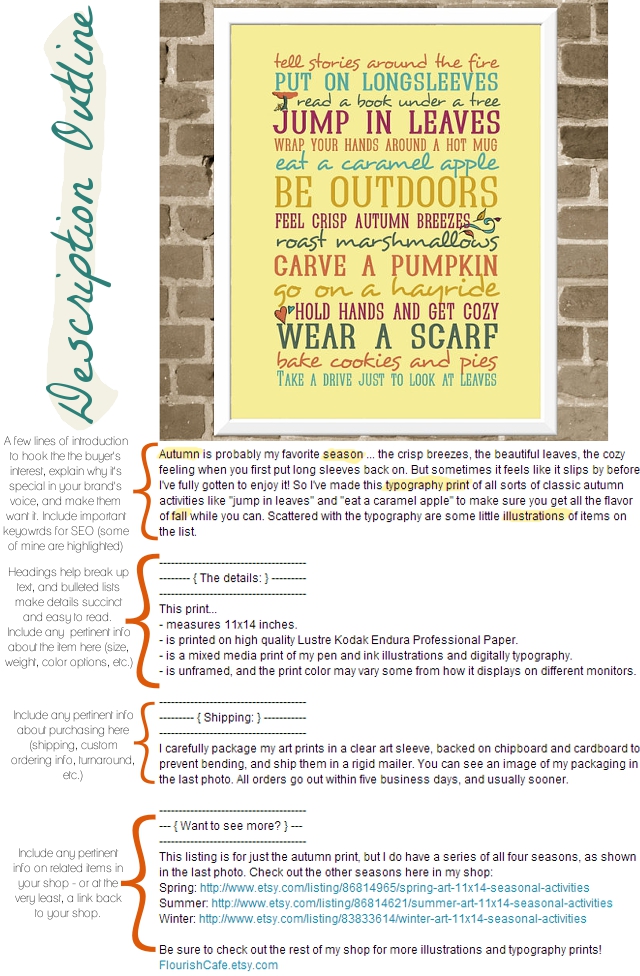
Of course, there a number of ways you can do an effective product description, but here’s a general outline that I use on my listings (such as the one below) and I hope you will find helpful:
For some more tips on writing item descriptions, you can check out this helpful article on Etsy’s Seller Handbook Blog.

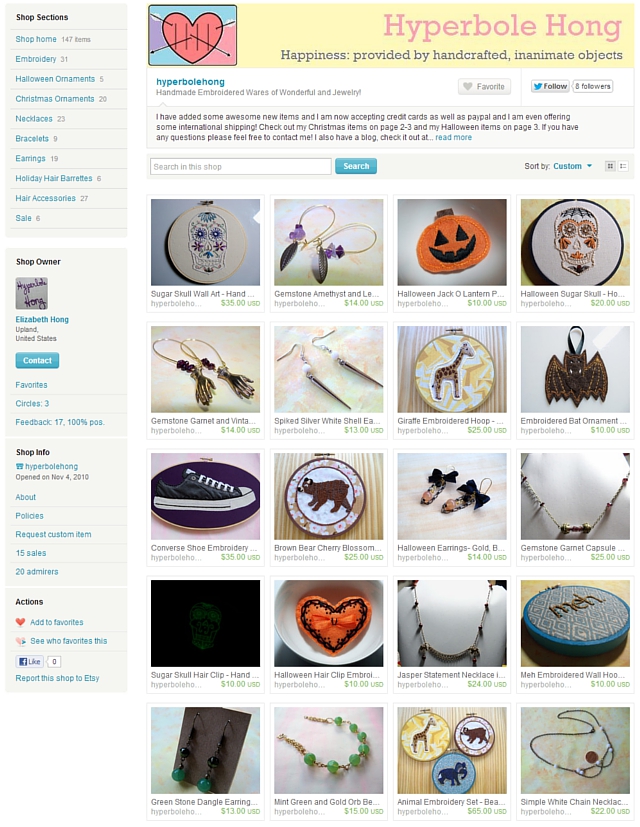
The critique this week is for Elizabeth Hong, owner of Hyperbole Hong. Here is what she posted in the critique request thread about today’s topic:
How can I make my items (through descriptions, photos, etc.) appealing to more people without losing my personality in the mix, or is sterilization a good thing
Thanks for the question!! Let’s take a look at her shop:
First of all, let’s take a look at some things she is doing well…
– Profile and About page: People like to learn about the person behind a handmade business, and Etsy recently gave a unique opportunity to provide this with the “About” page, where you can put up behind the scenes pictures of your process, information about you as an artist and more. Elizabeth has both her her profile and her about page filled out nicely, with interesting info and photos to give people a look into her creative process.
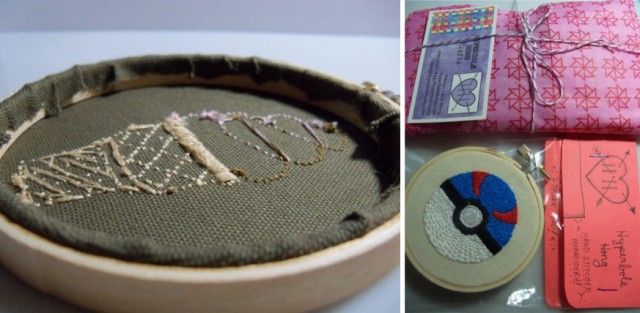
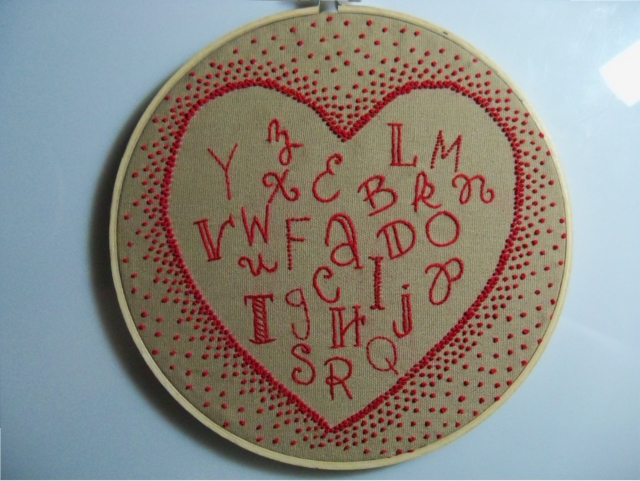
– Craftmanship: her items are look to be very well made. The embroidery in particular jumps out at me .. I’ve tried embroidery and mine never looks so good! :) Her eye for detail is clear in her work, such as the piece below.
– Secondary photographs: she is doing a great job of giving great visual information in the additional photo spots. Etsy lets you put up a total of 5 photos, so it is in your best interest to use all 5, and let each photo give new information. Since the viewers can’t pick up and turn over the item in their hands, use the photo spots to show them as much about the product visually as possible. For instance, she shows the backs of her embroidery, how she packages her items, and other great info in her additional photos.
Now we’ll move on to some things to improve:
– Finding the common thread: I know she mentioned “appealing to more people”, but really the goal isn’t to appeal to a wider audience, but rather to appeal more strongly to a narrow market. I love the eclectic-ness of her shop – from earrings with bows, to geekery inspired decor, to an embroidery piece based on a dress from Singing in the Rain. However, finding a common thread to the shop would be good, and how it ties together in appealing to her target market. She mentioned sterilization, and that is certainly not what I’m talking about – in fact it is the opposite, because the goal is to appeal just to her target market, not to absolutely everyone. I think it would be good to come up with some kind of phrase as far as what the shop is ABOUT and WHO it is that would be shopping there. For instance, the target market for the more formal looking necklaces is probably quite different to the target market for the Pokemon embroidery. (And side note here for Elizabeth – perhaps you have taken care of licencing and such for trademark names and such that you are using, but I wanted to throw this word of caution in here in case you haven’t … things like “X-box”, “pokemon”, “Nintendo”, etc. need to really be looked into as far as the legal side of things and whether you can use them. I know I get lots of requests for custom pieces in my shop that incorporate modern quotes that I simply can’t use due to copyright issues. So that is just a word of caution for you to be careful about the legal side of things.) But coming up with what the unifying theme of the shop is would be helpful in terms of branding and marketing it most effectively. The branding printable from my blog series might be helpful – it was intentionally designed for branding a blog, but could also be helpful in terms of a shop. You may find that you decide to focus on some items instead of others as a result of your theme.
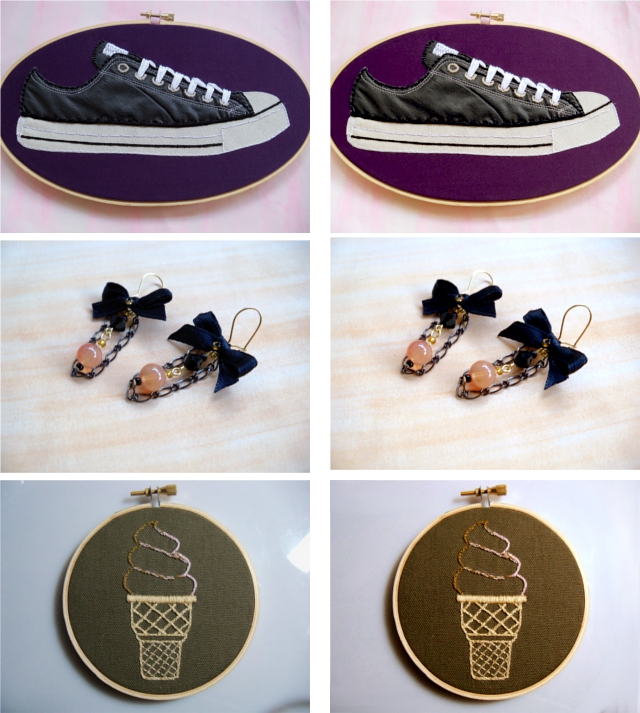
– Unifying your photography style: Once you’ve established the connecting theme of your shop, I’d recommend choosing one photography style to shoot all the different items. When you do have a variety of items, I think photography is a great way to tie them together. Think about your branding theme, and then I’d recommend choosing one or two backgrounds/settings that reflect that without distracting from the items, and use that to shoot them all. And the photography doesn’t have to be “sterilized” – you can put your personality into it! But I’d just recommend limiting the styles. Currently, I see some items in cups, some items on wood, some items on white, some items on a tree, some items on a jewelry form, etc., etc. Narrowing that down will help your shop feel more cohesive. As far as what background to choose … personally, since your items themselves have so much personality, you don’t want to distract TOO much with a competing background. If you use a white background though, you might think about brightening or touching up the color just a little in an image editing program. Here are a few that I think are successful in having a non competing background, and then I’m also showing the result of just a subtle adjustment in a photo editor:
I think these kinds of backgrounds really allow your items to pop – and ever though there is variety in those three items, they flow better with the similar backgrounds. I especially like that on the last two, we can see the entire item, even in thumbnail.
I think backgrounds you might want to avoid are the really bright/deep colored backgrounds (they are fun, but to the point of overwhelming the item itself especially in the thumbnail size image that people see in search results, and the item itself is what you want people to notice and remember) or the hair clips in cups (props should help reflect something about the item – since they were in cups, it looks like they are some kind of tea cozy or herbal sachet or something, to me, and it wasn’t until I started reading that I realized they were hair clips).
– Descriptions: I really like that you are conveying personality in your descriptions, and I think that is an excellent thing to continue. I especially like that you talk in the first person (“I was inspired to make this when..”), as that helps to drive home that these are handmade goods. A couple pointers, though, that might help you to be able to take your descriptions to the next level:
– Be concise but high impact: Keep words and sentences that pack a punch, put them higher in the description, cut out fluffier parts
– Put details in list form
– Have a description format that you use on all listings.
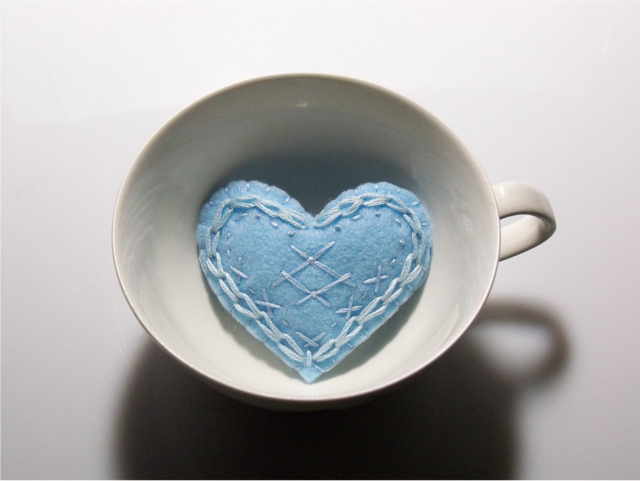
For instance, on this hair clip:
The description you have …
I love cute and unique hair accessories but it’s always so difficult to find something I can get excited about and something that can actually support some hair. That’s why I created this hair clip! I was in a creative rut when I designed these but I had a goal to come up with a hair accessory I could make for myself that would show off some embroidery but not look completely outrageous (well, maybe not completely), and I finally made this. I loved it so much I have made it in every color I have, so if this color isn’t to your liking please check my other listings.
This is a cute and frivolous hand cut light blue felt heart hand embroidered with matching and contrasting embroidery floss then filled with new poly fiber fill and blanket stitched closed. I then hot glue the slightly puffy heart to a metal hair barrette which is then stitched together for an added level of security.I only use these metal barrettes because I feel they are the only option out there than can securely hold hair without slipping. If you are interested in a set please contact me.
Each item I make is handmade and because of this each one is slightly unique. This item is ready to ship and I usually ship in two days or less.
My embroidered heart hair ornament is approximately 3” x 2” at its widest part.Everything I make is hand stitched, hand cut and hand assembled by me from my own sketches.
… could become (and I pretty much used words you already wrote, just rearranged)…..
This is a cute and frivolous hand cut light blue felt heart hand embroidered with matching and contrasting embroidery floss. I love hair accessories but it can be difficult to find something cute and unique that that can actually support some hair. That’s why I created this hair clip! The slightly puffy heart is filled with new poly fiber fill and blanket stitched closed, then both glued and stitched to a metal hair barrette for an added level of security.
More details on this sweet heart:
– it measures approximately 3” x 2” at its widest part.
– I use these metal barrettes for the back because they are so effective at actually holding hair.
– This item is ready to ship and I usually ship in two days or less.
– Everything I make is hand stitched, hand cut and hand assembled by me from my own sketches.Want something a little different?
I love this style of hair clip so much, I made them in a wide variety of colors. Check out the hair clip section of my shop to see the other options: http://www.etsy.com/shop/hyperbolehong?section_id=10455263
That way it makes it easy for a potential customer to take in all the necessary info at a glance, but still conveys your personality – just condensed to the more powerful parts!
I hope this has been helpful for Elizabeth, and others as well! (By the way, Elizabeth, I am totally digging those earrings with black bows!)
Are photos and descriptions something you struggle with? Leave your thoughts and comments below! :)

This was such a wonderful article!! Thanks SO much for sharing so many great ideas and tips and I can’t wait to start implementing some of them in my own photography! *Ü*
Another great article, April! I’m having a photoshoot tomorrow, so thinking about photography and tpuching base with the bascis is just what I needed tonight.
Thanks!
Another great article, April! I’m having a photoshoot tomorrow, so thinking about photography and touching base with the bascis is just what I needed tonight.
Thanks!
Thanks for addressing the description problem and giving us ideas!
I don’t think people really realize just how important editing is to photography. I would never list an item with out first touching the photos, because no matter how good your lighting is odds are the item still want come out true to color. It will look more dull in the photo then in real life, your white background will look off-white or grey. Plus using natural light can be a big hassle on partly cloudy days. I’ve experienced more than one photo shoot day where I went from good light, to crappy light, to perfect light, back to crappy light again lol, and editing has allowed me to save a lot of photos that otherwise would have ended up in the trash. It won’t completely make up for bad lighting, but my photos still come out good enough to use until I have the time to capture more in better lighting.
Oh! And when it comes to backgrounds I’ve learned that it really is best for them to always be white *however* the texture and shade of white can altered to create a cohesive and unique look. I use white tissue paper which has a very subtle texture and I normally shoot in the morning which will add a very faint pinkish/purplish shade to the photo.
Thanks for critiquing my shop! I really appreciate it, and that you were honest without being brutal, it’s definitely time for a change at my place!
Hello, i think that i saw you visited my website so i came to “return the favor”.
I am trying to find things to improve my website!I suppose its ok to use a few
of your ideas!!